The Secret to Perfect Red Velvet Cake Recipe (Tested 50+ Times)
Red velvet cake recipe perfection goes far beyond simply adding red food coloring to vanilla cake batter. Contrary to popular belief, red velvet cake is not just a chocolate cake with red dye. In fact, it’s a unique dessert with a fascinating history dating back to the Great Depression when red food coloring was first popularized.
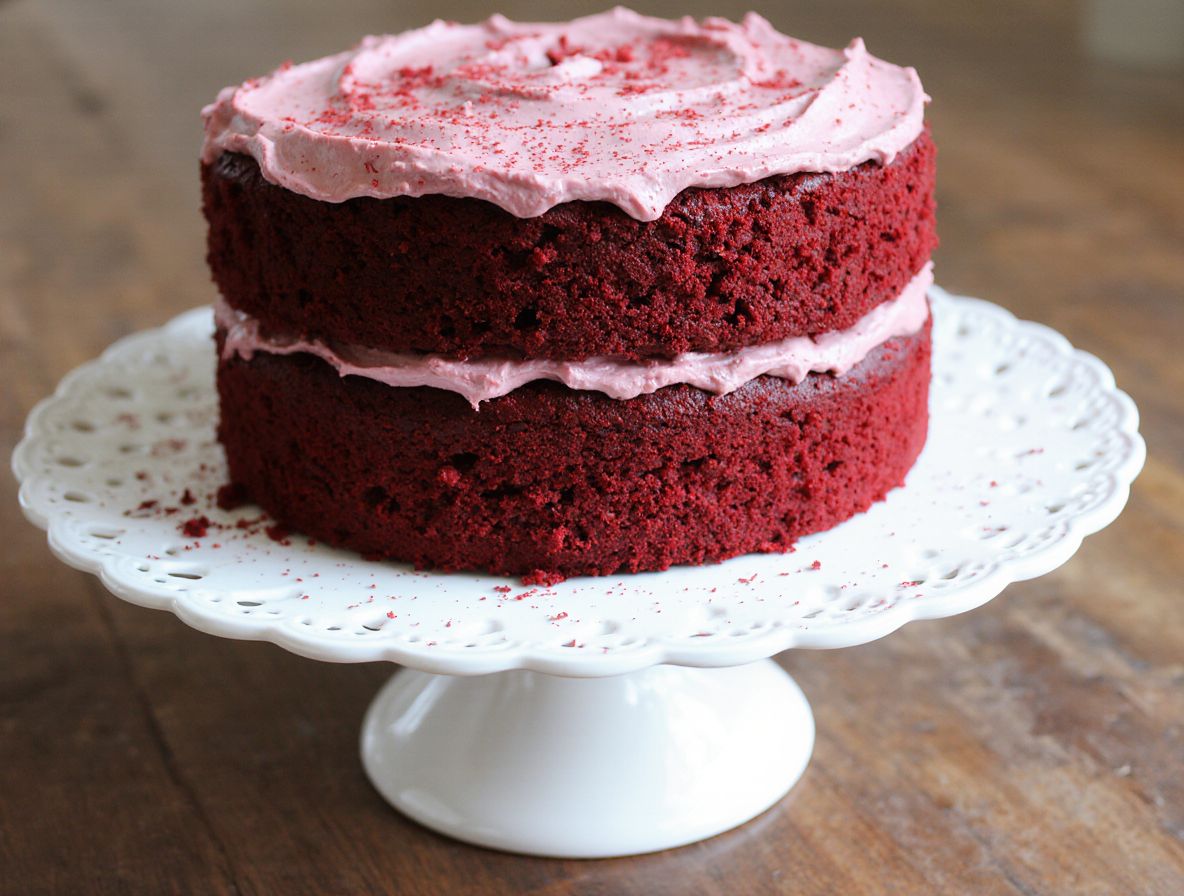
After testing this recipe more than 50 times, I’ve discovered what makes the best red velvet cake recipe truly special. It’s the remarkable combination of buttery, vanilla, and cocoa flavors, plus that delicious tang from buttermilk that creates its signature taste. The texture is equally impressive—dense yet soft with a moist and velvety crumb that literally sticks to the back of your fork[-4]. While a single slice does pack approximately 1321 calories, this homemade red velvet cake recipe is absolutely worth the splurge for special occasions.
What Makes Red Velvet Cake Unique
Many dessert enthusiasts mistakenly assume red velvet is simply chocolate cake with red food coloring. However, this iconic cake stands on its own with distinctive characteristics that have made it a beloved classic for generations.
The flavor profile: cocoa, vanilla, and tang
The signature taste of red velvet cake comes from a perfect harmony of three key elements. First, there’s a subtle cocoa flavor – much milder than chocolate cake since traditional recipes use only 1-2 tablespoons of cocoa powder. Second, a pronounced vanilla note provides sweetness and warmth. Finally, the distinctive tanginess from buttermilk and vinegar creates that unmistakable red velvet taste.
This delicate balance delivers what many describe as “slightly sweet and tart”. Additionally, the tanginess helps balance the sweetness of the cream cheese frosting that typically adorns red velvet cakes. Some bakers even add a touch of coffee to enhance the chocolate notes without overpowering the other flavors.
What is red velvet made of?
Traditional red velvet cake contains flour, sugar, butter, eggs, buttermilk, vinegar, baking soda, vanilla, cocoa powder, and red coloring. Furthermore, the distinctive reddish hue originally came from a fascinating chemical reaction – the anthocyanins (natural pigments) in non-Dutch processed cocoa powder reacting with acidic ingredients like buttermilk and vinegar.
Modern recipes typically use food coloring to achieve the vibrant red color, although some bakers prefer natural alternatives such as beet juice, beetroot powder, pomegranate powder, or cranberry powder. Nevertheless, regardless of coloring method, the combination of buttermilk and vinegar remains essential for both texture and flavor.
How it differs from chocolate cake
Despite containing cocoa, red velvet is fundamentally different from chocolate cake in several important ways. Primarily, chocolate cake uses significantly more cocoa powder or melted chocolate, creating a rich, intense chocolate flavor. Conversely, red velvet contains just enough cocoa for a hint of chocolate without overwhelming the other flavors.
Texture represents another significant difference. Red velvet cake has a lighter, softer, more tender crumb due to the reaction between acidic ingredients and baking soda. Meanwhile, chocolate cake tends to be denser and more moist.
The presence of buttermilk and vinegar in red velvet cake – ingredients not typically found in chocolate cake – creates the distinctive tanginess that chocolate cake lacks. Consequently, red velvet falls somewhere between vanilla and chocolate cake on the flavor spectrum, offering a unique taste experience that neither can provide.
Essential Ingredients for the Best Red Velvet Cake
Creating the perfect red velvet cake requires more than just following a recipe—it demands understanding the crucial ingredients that give this dessert its signature characteristics.
Cake flour vs. all-purpose flour
The foundation of any excellent red velvet cake begins with selecting the right flour. Cake flour contains approximately 10% protein content, primarily lower than all-purpose flour’s 11.7% protein level. This lower protein percentage means less gluten formation, resulting in a softer, more tender crumb that’s essential for achieving red velvet’s signature texture.
Indeed, cake flour produces a finer, more even crumb with enhanced tenderness. If you don’t have cake flour on hand, you can create a suitable substitute by combining 3/4 cup plus 2 tablespoons (105g) all-purpose flour with 2 tablespoons (14g) cornstarch.
The role of buttermilk and vinegar
Buttermilk serves as a critical ingredient in authentic red velvet cake, providing both tanginess and moisture. The lactic acid in buttermilk breaks down gluten strands, contributing to that distinctive “velvety” texture. Essentially, it works alongside white vinegar to create the cake’s characteristic tenderness.
White vinegar might seem odd in a cake recipe, but it’s fundamental to red velvet’s chemistry. It reacts with baking soda to activate proper leavening and enhances the reddish color by interacting with the cocoa powder.
Choosing the right cocoa powder
Natural cocoa powder (not Dutch-processed) is non-negotiable for traditional red velvet cake. With higher acidity (pH around 5), natural cocoa reacts with buttermilk and vinegar to create both the subtle reddish hue and proper leavening.
Dutch-processed cocoa has been alkalized, raising its pH to a neutral 7 or alkaline 8, making it unsuitable for red velvet as it won’t produce the proper color reaction or texture.
Natural vs. artificial red coloring
Traditionally, red velvet cake derived its color from a chemical reaction between acidic ingredients and cocoa’s anthocyanins. Modern recipes typically use red food coloring for vibrant results, but natural alternatives like beetroot powder exist.
When using beetroot powder, be aware it can impart an earthy flavor and may react differently with leavening agents than artificial coloring. For most consistent results, liquid or gel food coloring remains the practical choice.
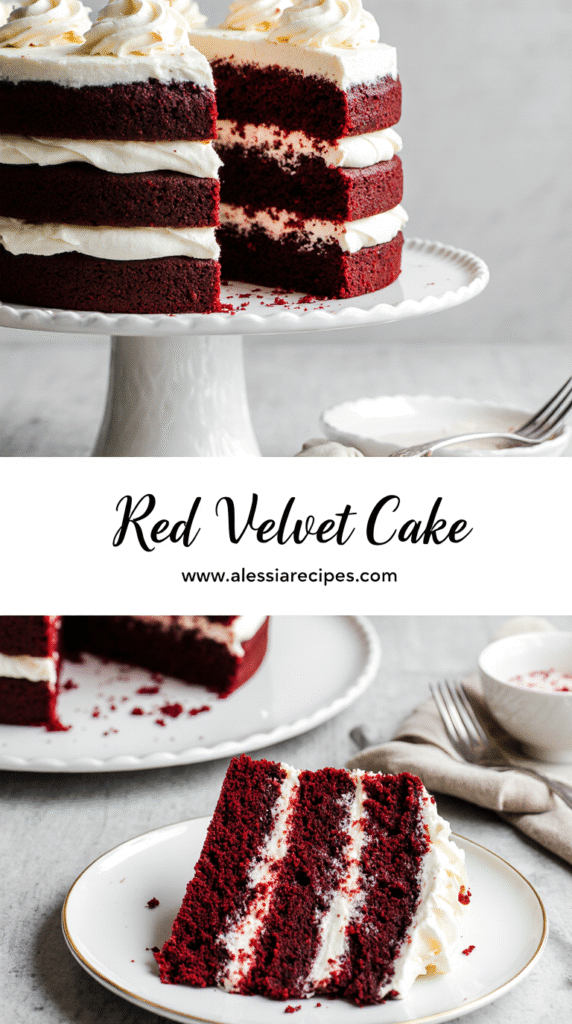
Cream cheese frosting for red velvet cake
Cream cheese frosting perfectly complements red velvet cake’s subtle flavors. A classic recipe combines 12 ounces cream cheese, 8 ounces butter, vanilla extract, and approximately 26 ounces powdered sugar. This frosting balances the cake’s mild chocolate notes and tanginess with its own creamy richness.
For the smoothest results, ensure both cream cheese and butter are properly softened before mixing. This frosting not only tastes divine but also provides the perfect visual contrast against the cake’s deep red interior.
Step-by-Step: My Perfected Red Velvet Cake Recipe
After extensive testing of over 50 batches, I’ve perfected a foolproof red velvet cake recipe that delivers consistent results every time. Throughout my experimentation, I discovered several crucial techniques that transform good red velvet cake into something extraordinary.
Preparing your pans and ingredients
Preheat your oven to 350°F (175°C). Next, thoroughly grease two 9-inch cake pans with butter or non-stick spray, line with parchment paper rounds, then grease the parchment paper as well. This double preparation ensures your cake releases perfectly.
Prior to mixing, gather all ingredients—what professional chefs call “mise en place”. Room temperature ingredients are vital; cold eggs or butter can create a dense texture. If needed, warm eggs quickly by placing them in warm water for a few minutes.
Mixing the batter: wet and dry ingredients
Begin by whisking your dry ingredients (flour, cocoa powder, baking soda, and salt) in a medium bowl until thoroughly combined. In a separate large bowl, cream butter and sugar until light and fluffy—about 2-3 minutes. This creates essential air pockets for a tender crumb.
Afterward, add oil, egg yolks, vanilla, and vinegar to your butter-sugar mixture. Initially combine on low speed, thereafter beat on high for 2 minutes. Alternately add dry ingredients and buttermilk, starting and ending with dry ingredients. This prevents overloading the batter with either component.
The secret step: whipping egg whites
The game-changing technique? Separately whip egg whites until soft peaks form. Specifically, this means when you pull out the whisk, little peaks appear that gently flop over at the tips. Gently fold these into your batter, cutting down the middle and turning the bowl a quarter-turn between folds.
Baking and cooling the layers
Bake at 350°F for 30-32 minutes or until a toothpick inserted comes out with a few moist crumbs. Do not wait for a completely clean tester—this indicates overbaking! Cool in pans for 10 minutes, subsequently turn onto a cooling rack to finish cooling completely.
Frosting, Assembly, and Final Touches
The crowning glory of any red velvet cake masterpiece lies in its creamy frosting, careful assembly, and artistic finishing touches. These final steps transform ordinary cake layers into a showstopping dessert worthy of celebration.
Making the perfect cream cheese frosting
For traditional red velvet cake, cream cheese frosting provides the ideal tangy-sweet complement. Begin by beating softened cream cheese and butter until completely smooth and lump-free. Next, gradually incorporate sifted powdered sugar while mixing on low speed to prevent mess. Add vanilla extract and a pinch of salt to balance sweetness. For the smoothest results, ensure both cream cheese and butter are properly softened beforehand—never microwaved, as this risks melting.
To create a sturdier frosting for piping decorations, chill it in the refrigerator for about 20 minutes. Moreover, for absolute stability when creating intricate designs, consider adding an extra ½ cup of powdered sugar.
Layering and frosting the cake evenly
First, level your cake layers using a serrated knife to remove any domes. Place the first layer on your cake stand, then spread approximately ½ cup of frosting evenly on top. Add the next layer and repeat until all layers are stacked.
Apply a thin crumb coat—a light layer of frosting that seals in loose crumbs—over the entire cake. Chill for 30-60 minutes until firm. Afterward, add the final thicker layer of frosting, smoothing with an offset spatula or bench scraper.
Decorating tips for a professional finish
For an elegant finish, reserve about a cup of frosting in a piping bag fitted with a decorative tip. Pipe a border around the top edge or create rosettes for a sophisticated touch.
A classic red velvet decoration involves pressing cake crumbs along the sides or bottom edge of the cake. These crumbs come from trimmed cake tops and add visual interest while hinting at what’s inside.
Storage and make-ahead tips
Store frosted red velvet cake covered at room temperature for up to 2 days or refrigerated for up to 5 days. For freezing, wrap unfrosted layers tightly in plastic wrap and freeze for up to 3 months. Thaw overnight in the refrigerator before assembling.
For make-ahead convenience, prepare cake layers and frosting separately. The frosting can be refrigerated overnight—just bring it to room temperature and re-whip before using.
Conclusion
Red velvet cake stands as a truly special dessert that deserves its iconic status in the baking world. After testing this recipe more than 50 times, I can confidently say the perfect red velvet cake depends on understanding its unique chemistry and respecting traditional techniques. The delicate balance of subtle cocoa, vanilla, and tangy buttermilk creates that unmistakable flavor profile we’ve come to love.
Perhaps most importantly, success lies in the details—using cake flour for tenderness, natural cocoa powder for proper chemical reactions, and the magical combination of buttermilk and vinegar for that signature velvety texture. Additionally, whipping egg whites separately before folding them into the batter makes a remarkable difference in achieving the ideal crumb structure.
Though many bakers attempt shortcuts, authentic red velvet cake rewards those who embrace its complexity. The complementary tang of cream cheese frosting provides the perfect finishing touch, creating a dessert that’s both visually stunning and deliciously unique. Whether baking for a special occasion or simply treating yourself, this tested recipe delivers consistent, impressive results.
Actually, mastering red velvet cake brings a special satisfaction unlike any other baking project. The techniques you’ll learn—proper ingredient preparation, careful mixing methods, and professional frosting skills—will undoubtedly enhance your overall baking expertise. While this cake certainly qualifies as an indulgence, the joy of creating and sharing the perfect red velvet cake makes every calorie worthwhile!
FAQs
Q1. What’s the secret to achieving a moist and fluffy red velvet cake? The key lies in using the right ingredients and techniques. Granulated sugar adds moisture and softness, while eggs help the cake rise and create a soft texture. Using oil instead of butter contributes to moisture, and incorporating whipped egg whites separately into the batter enhances the cake’s fluffiness.
Q2. How can I prevent my red velvet cake from becoming dense? To avoid a dense cake, ensure you’re beating enough air into the batter, add eggs gradually to prevent curdling, and use the correct amount of leavening agent. Also, be careful not to overmix the batter once the dry ingredients are added, as this can lead to a denser texture.
Q3. What’s the best way to tell when a red velvet cake is fully baked? A perfectly baked red velvet cake will spring back when lightly pressed in the center. Additionally, insert a toothpick into the center – it should come out with a few moist crumbs, but not wet batter. Avoid waiting for a completely clean toothpick, as this could indicate overbaking.
Q4. What makes red velvet cake different from chocolate cake? Red velvet cake contains significantly less cocoa powder than chocolate cake, resulting in a milder chocolate flavor. It also incorporates buttermilk and vinegar, which create a distinctive tangy taste and contribute to its velvety texture. The cake’s signature red color traditionally came from a chemical reaction between cocoa and acidic ingredients.
Q5. How should I store red velvet cake to maintain its freshness? A frosted red velvet cake can be stored covered at room temperature for up to 2 days or refrigerated for up to 5 days. For longer storage, you can freeze unfrosted cake layers tightly wrapped in plastic for up to 3 months. When ready to use, thaw the frozen layers overnight in the refrigerator before assembling and frosting.