The Secret to Perfect Biscuits and Gravy Pizza: Homemade Breakfast Magic

Biscuits and gravy pizza might sound unconventional, but this breakfast mashup is exactly what your morning routine needs. Imagine a warm, fluffy biscuit base generously covered in creamy sausage gravy and finished with a golden, cheesy topping. This southern-inspired creation takes traditional breakfast favorites and transforms them into something extraordinary.
I’ve discovered that breakfast pizza with sausage gravy is not just another morning meal—it’s a delicious experience that serves many people with minimal effort. Rather than grabbing a cold leftover slice as you rush out the door, this sausage gravy breakfast pizza features homemade sausage gravy, two types of cheese, and gooey eggs piled on buttery biscuits. Certainly, this could become your perfect breakfast too!
Throughout this guide, we’ll explore everything you need to know about creating this morning masterpiece—from selecting the ideal crust to preparing the creamiest gravy and assembling your breakfast pizza for maximum flavor. Instead of a standard breakfast, why not try something that’s both fun to eat and satisfying?
Choosing the Right Crust for Your Breakfast Pizza
The foundation of any great biscuits and gravy pizza lies in selecting the perfect crust. The base you choose will significantly impact both the flavor and texture of your breakfast masterpiece, so let’s explore your options.
Biscuit dough vs. crescent rolls vs. pizza dough
Biscuit dough creates a flaky, tender foundation that perfectly complements sausage gravy. For the authentic breakfast pizza experience, I recommend using jumbo buttermilk biscuits from a can – they’re specifically designed to hold up well to hearty toppings. Biscuit crusts add a unique, fluffy texture that pairs wonderfully with savory breakfast ingredients.
Alternatively, crescent rolls offer a lighter, flakier base. When using crescent rolls, you’ll need to arrange them in a circle with points toward the center, pressing the seams together to form a unified crust. The slightly buttery flavor works beautifully with breakfast ingredients, though they tend to be thinner than biscuit crusts.
Traditional pizza dough provides a chewier texture similar to what you’d expect from a standard pizza. This option allows for easier stretching and shaping but lacks the distinct breakfast feel that biscuits provide. If using homemade pizza dough, letting it rest overnight creates greater complexity in flavor.
How to press and shape the dough
For biscuit dough, start by lightly spraying your baking sheet with cooking oil. Place one biscuit in the center of your pan and arrange the remaining biscuits in a circle around it. Press firmly with your hands to seal the seams between biscuits while simultaneously stretching the dough to fill the pan. For best results, leave about a 1-inch border between the dough and the edge of the pan.
When working with crescent rolls, separate the dough into triangles and place them on your pan with points toward the center. Press the dough together, ensuring the bottom is completely sealed while creating a slightly raised edge.
For pizza dough, flour your hands and work surface first. Press down on the middle of the dough ball, then work outward, leaving the outer edge untouched for the crust. Stretch until it’s 14-16 inches in diameter. Additionally, try stretching the dough gently over your fists, letting gravity do most of the work.
Tips for pre-baking the crust
Pre-baking is essential for a perfect texture – it prevents the dreaded soggy center! First, preheat your oven to 425°F. Before baking, use a fork to “dock” (poke holes in) the dough, working from the center outward but stopping about an inch from the edge. This prevents bubbling and helps release steam.
For biscuit crusts, bake until they’re just starting to rise and getting slightly golden on the bottom, approximately 20-21 minutes. Pizza dough typically needs 5-7 minutes of pre-baking, while crescent roll crusts require about 7-8 minutes until lightly browned.
Furthermore, brushing the crust with olive oil before pre-baking adds flavor and helps achieve a golden finish. Remember that your crust should be light brown but not fully cooked – it’ll finish baking once you add your toppings.
Making the Perfect Sausage Gravy
The heart of any memorable biscuits and gravy pizza is undoubtedly the creamy, flavorful sausage gravy that brings everything together. Creating this essential component requires attention to detail and the right technique.
Ingredients for homemade gravy
For perfect homemade sausage gravy, you’ll need:
- 1 pound breakfast sausage (sage-flavored recommended for extra flavor)
- 1/4 cup all-purpose flour
- 2 to 2 1/2 cups whole milk (using whole milk creates ideal consistency)
- 1-2 tablespoons butter (optional)
- 1/2 teaspoon garlic powder
- 1/2 teaspoon black pepper
- Salt to taste
Moreover, some recipes include optional seasonings like Tony’s Creole Seasoning or a pinch of crushed red pepper for extra kick.
Step-by-step gravy preparation
First, cook the sausage in a large skillet over medium-high heat, crumbling it thoroughly with a spoon as it cooks. Allow the sausage to brown properly – this adds significant flavor to your gravy breakfast pizza.
Once browned, do not drain the grease – it’s essential for the next step. Sprinkle the flour directly over the cooked sausage and stir constantly for 2-3 minutes until the flour is completely absorbed.
Subsequently, gradually add milk while continuously whisking to prevent lumps. Reduce the heat to a simmer and allow the gravy to thicken, stirring frequently. For thicker gravy, use about 2 cups of milk; for thinner consistency, add more.
How to thicken and season properly
The key to perfectly thickened sausage gravy lies in creating a proper roux with the sausage fat and flour. If your gravy isn’t thickening appropriately, try these techniques:
Continue simmering longer – this naturally evaporates liquid and concentrates flavors. Alternatively, create a slurry by mixing 1 teaspoon flour with 1 tablespoon cold water, then whisk this into your simmering gravy.
Regarding seasoning, taste before serving and adjust accordingly. Black pepper is particularly important – gravy for biscuits and gravy pizza traditionally features generous pepper. Remember that gravy will thicken further as it cools, making it perfect for spreading on your breakfast pizza base.
Layering and Baking Your Biscuits and Gravy Pizza
Now comes the exciting part—assembling your breakfast pizza! Once your pre-baked crust is ready and your sausage gravy is prepared, it’s time to create breakfast magic.
Spreading the gravy evenly
After your crust has slightly cooled from pre-baking, carefully pour the warm sausage gravy across its surface. Using the back of a large spoon, spread the gravy in a thin, even layer, leaving a small border (about 1/2 inch) around the edges to create a visible crust. This border prevents messy overflow during baking. The gravy should be thick enough to coat the crust without making it soggy—this is where proper gravy consistency becomes crucial.
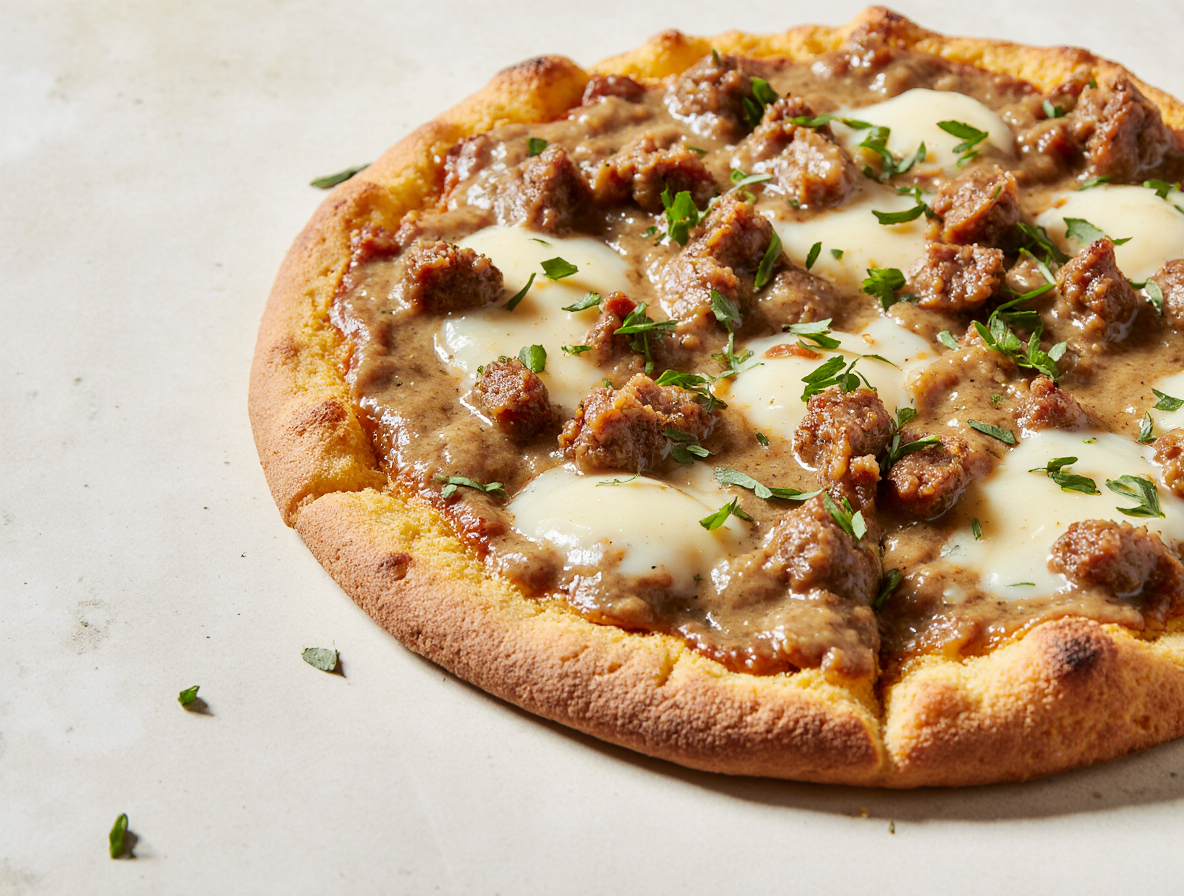
Adding cheese, eggs, and toppings
Once your gravy is perfectly spread, it’s time for toppings! First, add a middle layer of cheese—either shredded cheddar or Monterey Jack works wonderfully. This cheese layer creates a delicious barrier between gravy and additional toppings.
For eggs, you have two options. First option: make small indentations in the gravy using the back of a spoon and crack whole eggs directly into these wells. Alternatively, lightly scramble eggs until glossy but still moist (they’ll cook further in the oven) and sprinkle them over the cheese layer.
Finally, add remaining toppings—bacon pieces, additional sausage, green onions, or bell peppers—before finishing with a final cheese layer. Many recipes recommend mozzarella for its excellent melting properties.
Baking time and temperature tips
Bake your assembled pizza at 425°F on the middle rack for optimal results. Baking times vary based on your crust choice: biscuit crusts typically need 15-20 minutes, while pre-baked pizza crusts require only 10-12 minutes.
If using whole cracked eggs, extend baking time to 20-25 minutes until egg whites are completely set. For pizzas with scrambled eggs, 6-8 minutes is often sufficient since the eggs are already partially cooked.
How to know when it’s done
Your biscuits and gravy pizza is done when the cheese has melted completely and turned slightly golden. The crust edges should be a beautiful golden brown. If using whole eggs, look for set whites with slightly jiggly yolks for that perfect runny center.
Importantly, allow your pizza to rest for 3-5 minutes after removing it from the oven. This resting period lets the gravy set slightly and makes slicing much cleaner and easier.
Serving, Storing, and Reheating Tips
Your freshly baked biscuits and gravy pizza deserves perfect accompaniments and proper handling for leftovers. Following a few simple guidelines will ensure you enjoy every bite, both fresh and reheated.
Best sides to serve with breakfast pizza
Balancing the rich, savory flavors of biscuits and gravy pizza requires thoughtful side dishes. A fresh fruit salad provides welcome sweetness that complements the hearty breakfast pizza. Alternatively, a crisp arugula salad offers a lighter counterpoint to the richness of sausage gravy breakfast pizza.
For beverages, consider these perfect pairings:
- Hot coffee (the classic choice)
- Sweet iced tea
- Freshly squeezed orange juice
Some folks even enjoy extra gravy on the side for dipping their pizza slices! This creates an even more indulgent experience with your gravy breakfast pizza.
How to store leftovers
Proper storage begins with cooling your biscuits and gravy breakfast pizza to room temperature first. Afterward, wrap individual slices tightly in plastic wrap—never use aluminum foil alone or the original box, as these won’t create an airtight seal.
Store your wrapped slices in an airtight container in the refrigerator for 3-4 days. The key to preserving texture lies in preventing moisture loss while keeping bacteria away.
For longer storage, despite scrambled eggs not freezing well, you can freeze individual slices. Wrap each slice in plastic wrap first, then aluminum foil, and freeze for up to one month. Thaw overnight in the refrigerator before reheating.
Reheating without losing texture
The oven method produces the best results for reheating biscuits and gravy pizza. Preheat to 350-375°F and place slices directly on the oven rack or on a preheated baking sheet for 10-12 minutes. This method restores the crust’s crispness while warming toppings thoroughly.
Essentially, avoiding the microwave prevents soggy crusts. Nevertheless, if you’re in a hurry, place a cup of water next to your pizza slice in the microwave—this creates steam that helps distribute heat more evenly.
For a skillet method that preserves texture perfectly, heat a nonstick pan over medium heat, add your slice, and cover with a tight-fitting lid for about 5 minutes. This technique crisps the bottom while gently warming the toppings.
Conclusion
Biscuits and gravy pizza truly represents breakfast innovation at its finest. Throughout this guide, I’ve shared my favorite techniques for creating this morning masterpiece—from selecting the perfect crust to crafting creamy sausage gravy. Undoubtedly, the magic happens when these components come together, creating something far greater than the sum of its parts.
After trying different variations, I can confidently say that biscuit dough provides the most authentic breakfast experience, though crescent rolls offer a delightful alternative. The gravy itself serves as the heart of this creation, so taking time to develop those rich flavors pays off tremendously.
Beyond just the recipe itself, this breakfast pizza brings something special to your morning routine. Unlike ordinary breakfast options, it combines familiar flavors in an unexpected way. Additionally, it works wonderfully for feeding a group or preparing make-ahead meals for busy weekdays.
The next time you’re craving something beyond basic breakfast fare, remember this sausage gravy breakfast pizza. With its buttery crust, savory gravy, melty cheese, and perfectly cooked eggs, it delivers everything you could want from a hearty morning meal. Best of all, you can customize it with your favorite toppings or adjust the gravy seasoning to suit your taste preferences.
Whether you’re cooking for family, hosting weekend guests, or simply treating yourself, this breakfast pizza promises to impress. Give it a try—your morning routine will never be quite the same again!
FAQs
Q1. What’s the best type of crust for a biscuits and gravy pizza? While you can use biscuit dough, crescent rolls, or pizza dough, biscuit dough provides the most authentic breakfast experience. Jumbo buttermilk biscuits from a can work well as they hold up to hearty toppings and provide a fluffy texture that complements the gravy.
Q2. How do you make the perfect sausage gravy for the pizza? Start by browning breakfast sausage in a skillet. Without draining the grease, add flour and stir for 2-3 minutes. Gradually whisk in milk and simmer until thickened. Season with garlic powder, black pepper, and salt to taste. The key is creating a proper roux with the sausage fat and flour for ideal thickness.
Q3. What are some recommended toppings for a breakfast pizza? Popular toppings include shredded cheddar or Monterey Jack cheese, scrambled or whole eggs, bacon pieces, additional sausage, green onions, and bell peppers. Finish with a layer of mozzarella cheese for excellent melting properties.
Q4. How long should I bake the biscuits and gravy pizza? Bake at 425°F on the middle rack. Baking times vary: biscuit crusts typically need 15-20 minutes, while pre-baked pizza crusts require only 10-12 minutes. If using whole cracked eggs, extend baking time to 20-25 minutes until egg whites are completely set.
Q5. What’s the best way to reheat leftover breakfast pizza? For best results, reheat in the oven at 350-375°F for 10-12 minutes. This restores the crust’s crispness while warming toppings thoroughly. Alternatively, use a covered skillet over medium heat for about 5 minutes to crisp the bottom and gently warm the toppings.