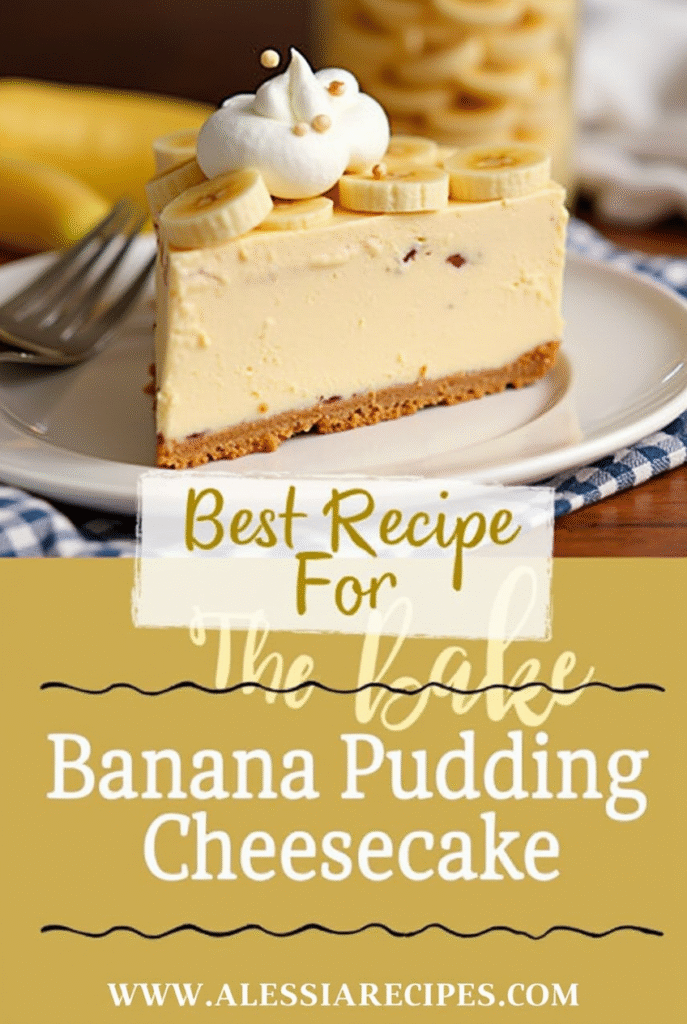
The Foolproof No-Bake Banana Pudding Cheesecake (15-Minute Recipe)
After over 30 years of developing no-bake treats, I’ve perfected this no bake banana pudding cheesecake that combines two beloved desserts into one show-stopping creation. This ultra-creamy dessert features a buttery vanilla wafer crust topped with a smooth, banana-flavored filling that requires just 15 minutes of preparation time.
This banana pudding no bake cheesecake recipe is ideal for warm weather or whenever you need an impressive dessert without turning on the oven. In fact, my no bake banana cheesecake recipe uses just 8 ounces of cream cheese and 3.4 ounces of banana pudding mix to create a light, refreshing treat. Whether you’re looking for an easy no bake banana pudding cheesecake for a family gathering or a make-ahead dessert that can be refrigerated for up to 4 days, this banana pudding cheesecake recipe no bake option delivers consistent results.
We’ll walk through every step of creating this foolproof dessert, from preparing the perfect crust to achieving that ideal creamy texture. Additionally, I’ll share expert tips for making sure your cheesecake sets properly and stays fresh. The best part? You can prepare this dessert ahead of time and refrigerate it for 2-4 hours before serving, or even freeze it for up to 2-3 months for later enjoyment.
Essential Ingredients for a No-Bake Banana Pudding Cheesecake
Creating the perfect no bake banana pudding cheesecake begins with gathering quality ingredients. The magic happens when these simple components come together to create those classic banana pudding flavors in creamy cheesecake form.
Crust ingredients: cookies, butter, sugar
The foundation of any great no bake banana pudding cheesecake is a sturdy, flavorful crust. While traditional cheesecakes often use graham crackers, vanilla wafers are the authentic choice for this dessert:
- Vanilla Wafers: 1½-2¼ cups of crushed Nilla wafers provide that classic banana pudding base. If these aren’t available in your area, graham crackers or ladyfingers make excellent substitutes.
- Butter: 4-6 tablespoons of unsalted butter binds everything together. I always opt for unsalted sweet cream butter for the best flavor. Some recipes call for melted butter, while others recommend softened butter for a different texture.
- Sugar: ¼ cup of sugar enhances the sweetness. Most recipes use granulated white sugar, though brown sugar adds moisture that helps solidify the crust naturally.
Filling ingredients: cream cheese, pudding mix, milk
The star of this no bake creation is the creamy, banana-flavored filling:
- Cream Cheese: Full-fat brick-style cream cheese (8-32 ounces depending on recipe size) is essential—tub varieties simply won’t set properly. Always bring it to room temperature for a smooth texture.
- Pudding Mix: Instant banana cream or vanilla pudding mix (3.4-ounce box) provides flavor and helps stabilize the filling.
- Milk: ¾-2 cups of milk activates the pudding mix. Any fat content works, though whole milk creates a richer texture.
- Sweeteners: Recipes typically include granulated sugar (1-1⅓ cups) for the filling and powdered sugar (¼-½ cup) for the whipped topping.
- Additional Ingredients: Many recipes incorporate sour cream or Greek yogurt for tanginess, vanilla extract for depth, and whipped topping for lightness.
Toppings: bananas, whipped cream, wafers
The finishing touches make this dessert instantly recognizable:
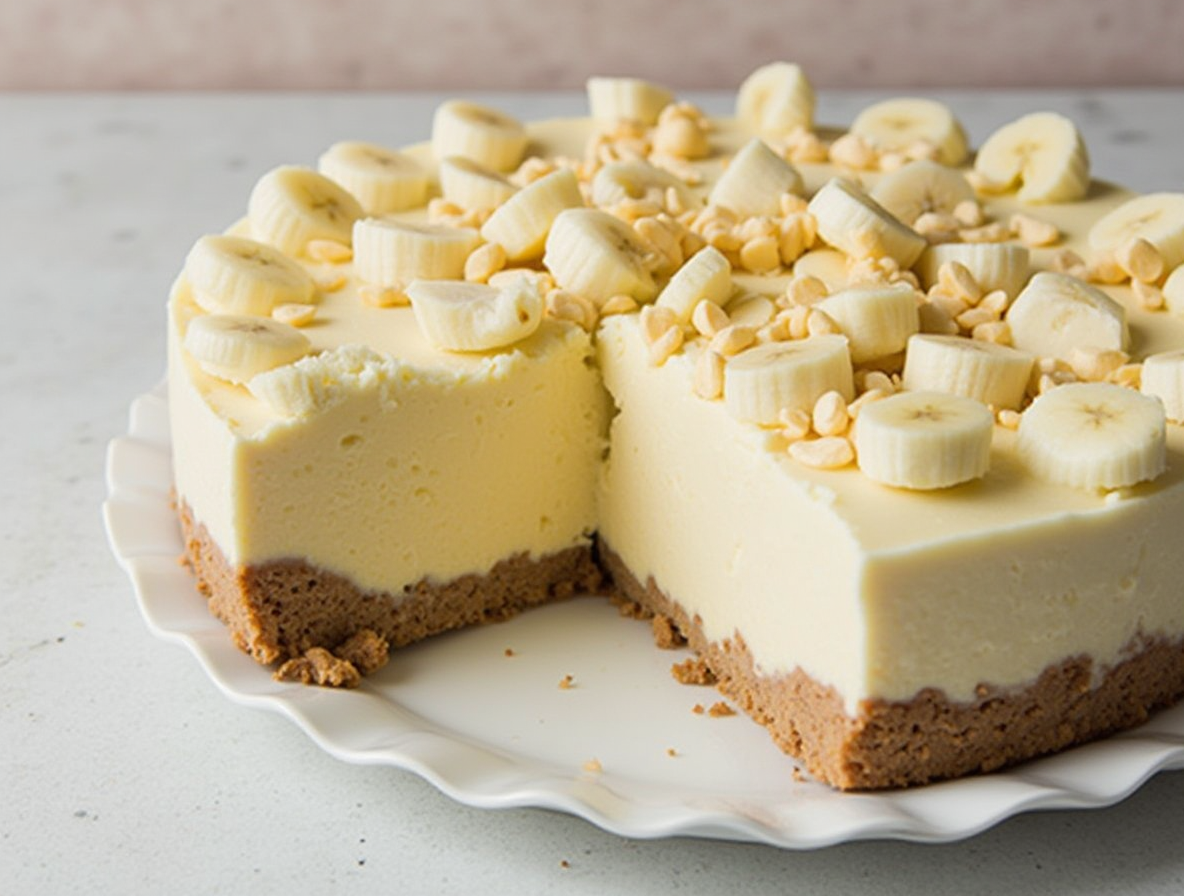
- Bananas: 2-3 medium ripe bananas provide authentic flavor. Some recipes layer sliced bananas within the filling, while others reserve them for topping just before serving to prevent browning.
- Whipped Cream: Either homemade (using 1 cup heavy cream, sugar, and vanilla) or store-bought whipped topping creates a cloud-like finish.
- Vanilla Wafers: Whole wafers, mini wafers, or crushed pieces add visual appeal and textural contrast when arranged on top.
Furthermore, storing these ingredients properly ensures the best results—keep cream cheese at room temperature before mixing but refrigerate the completed cheesecake for at least 3-4 hours before serving.
Step-by-Step Guide to Making the Cheesecake
Let’s roll up our sleeves and make this no bake banana pudding cheesecake in just minutes! This step-by-step guide breaks down the process into simple stages anyone can master.
1. Prepare the crust and chill
Start by crushing vanilla wafers in a food processor until they form fine crumbs. Mix these crumbs with 2-3 tablespoons of sugar (brown sugar works best) and 4-6 tablespoons of melted butter until they resemble wet sand. Press this mixture firmly into the bottom and slightly up the sides of a 9-inch springform pan. The tighter you pack it, the less likely it will crumble when serving. Pop the crust into the freezer for about 20 minutes to firm up as you prepare the filling.
2. Mix the banana pudding cheesecake filling
In a large bowl, beat 8 ounces of softened cream cheese until smooth and creamy. Next, add sugar (about 1/3 cup) and mix until well combined. Pour in the dry banana pudding mix (don’t prepare it as directed on the package), followed by a teaspoon of vanilla extract. For an authentic banana flavor, fold in 1-2 mashed ripe bananas. Finally, gently incorporate whipped topping or freshly whipped cream to create a light, airy texture.
3. Layer bananas and filling
Remove the chilled crust from the freezer. For a classic banana pudding effect, arrange a layer of thinly sliced bananas over the crust. Then pour half the cheesecake filling over the bananas, spreading it evenly. Add another layer of banana slices, followed by the remaining filling. Smooth the top with an offset spatula.
4. Chill and set the cheesecake
Cover the cheesecake with plastic wrap and refrigerate for at least 4 hours, although overnight chilling produces the best results. During this time, the filling will firm up to a perfect sliceable consistency.
5. Add toppings before serving
Just prior to serving, decorate your easy no bake banana pudding cheesecake with swirls of whipped cream, whole vanilla wafers, and fresh banana slices. Remember to add the fresh banana garnish at the last minute to prevent browning.
Tips for the Perfect No-Bake Banana Cheesecake
Mastering a few key techniques makes the difference between a good and a spectacular no bake banana pudding cheesecake. Based on my experience, these simple yet crucial tips will help you achieve perfect results every time.
Use room temperature cream cheese
The foundation of a silky-smooth no bake banana cheesecake begins with properly softened cream cheese. Cold cream cheese creates those dreaded lumps that no amount of mixing can fix. For best results, remove your cream cheese from the refrigerator at least one hour before starting. Unwrap and cut it into cubes to speed up the softening process if you’re short on time. Moreover, always use brick-style, full-fat cream cheese rather than spreadable varieties from tubs, as the latter contains additives that prevent proper setting.
Fold whipped topping gently
When incorporating whipped cream into your cheesecake mixture, technique matters significantly. Use a spatula—never an electric mixer—for this step. Fold about one-third of the whipped cream first to lighten the base, consequently adding the remainder in gentle, sweeping motions. Overmixing deflates the air bubbles that give your no bake banana pudding cheesecake its mousse-like texture and structural integrity.
Chill for at least 4 hours
Patience truly pays off with this dessert. A minimum chilling time of 4 hours is essential for proper setting, although overnight refrigeration yields even better results. First thing to remember: rushing this step results in a too-soft filling that won’t hold its shape when sliced. For clean, picture-perfect slices, wipe your knife with a napkin between cuts.
Add bananas just before serving
To prevent unsightly browning, add fresh banana slices as a topping just before serving. If you’re concerned about discoloration, particularly for make-ahead preparations, toss banana slices in lemon juice or orange juice. Otherwise, consider using freeze-dried banana slices as a garnish for longer-lasting visual appeal.
Try different crust options
While vanilla wafers create the classic banana pudding experience, experimenting with alternative crusts adds delightful variety:
- Graham crackers for traditional cheesecake flavor
- Chocolate wafers for a cocoa twist
- Golden Oreos for extra sweetness
- Pecan Sandies or Nutter Butters for nutty dimension
Each crust option complements the creamy banana filling differently, giving you endless possibilities for customizing your no bake banana cheesecake recipe.
Storage, Freezing, and Make-Ahead Advice
Your delicious no bake banana pudding cheesecake deserves proper storage to maintain its freshness and flavor. Accordingly, here’s everything you need to know about keeping your dessert in perfect condition, whether for a few days or longer.
How to store in the fridge
For optimal freshness, store your no bake banana pudding cheesecake in an airtight container or tightly wrapped with plastic wrap. This prevents the cheesecake from absorbing other odors in your refrigerator and maintains its moisture. Place the container on a flat surface in the fridge, away from strong-smelling foods. Essentially, keeping the dessert covered is crucial for preserving both texture and flavor.
Freezing tips and texture changes
Yes, you can freeze your no bake banana cheesecake! For best results:
- Ensure the cheesecake has completely cooled before freezing
- Freeze the whole cheesecake or individual slices as needed
- Wrap tightly with plastic wrap, followed by aluminum foil
- Place in an airtight container for extra protection
- Store upright on a flat freezer shelf
The banana pudding cheesecake will maintain its quality in the freezer for up to 2-3 months. When ready to enjoy, thaw overnight in the refrigerator—never at room temperature. Furthermore, be aware that freezing may slightly change the texture, making it somewhat denser or ice-cream-like.
Best time to add toppings
Timing matters tremendously when adding fresh toppings. Add whipped cream, banana slices, and vanilla wafers just before serving. Fresh bananas brown quickly when exposed to air. However, if you need to prepare in advance, toss banana slices in lemon juice to slow browning. You might also consider adding 1 oz cream cheese per cup of heavy cream to create stabilized whipped cream that holds its shape longer.
How long it lasts
In the refrigerator, your no bake banana pudding cheesecake will stay fresh for 3-5 days. Without banana slices, it may last even longer—up to a week. The cheesecake actually improves after a day in the refrigerator as flavors meld together. Nonetheless, for safety reasons, don’t leave the cheesecake at room temperature for more than 2 hours.
Conclusion
This no-bake banana pudding cheesecake truly stands as a testament to simplicity meeting decadence. Throughout my years of dessert-making, I’ve found few recipes that deliver such impressive results with minimal effort. You now have all the necessary knowledge to create this crowd-pleasing treat—from selecting quality ingredients to mastering the proper chilling techniques.
Remember that patience plays a crucial role in achieving that perfect creamy texture. Allow your cheesecake adequate time to set, and certainly don’t rush the process. Your reward will be a dessert that slices beautifully and melts in your mouth.
Additionally, this versatile recipe welcomes customization. Feel free to experiment with different crust options or add your personal touch with various toppings. The basic formula remains foolproof regardless of these creative adjustments.
Perhaps the greatest advantage lies in the make-ahead potential. This cheesecake actually tastes better after the flavors have had time to meld together overnight. This feature makes it perfect for busy hosts who prefer preparing desserts in advance.
Lastly, don’t forget those final fresh toppings just before serving—they transform an already delicious dessert into a visually stunning centerpiece. Your guests will undoubtedly ask for the recipe, wondering how something so impressive required only 15 minutes of preparation time!
Give this no-bake banana pudding cheesecake a try during your next gathering or simply as a weekend treat. The combination of creamy filling, crunchy crust, and fresh bananas creates a dessert experience that satisfies on every level.
FAQs
Q1. How long does it take to prepare this no-bake banana pudding cheesecake? This delicious dessert requires only 15 minutes of preparation time, making it perfect for busy cooks or last-minute gatherings.
Q2. Can I make this cheesecake ahead of time? Yes, you can prepare this cheesecake in advance. It can be refrigerated for up to 4 days or frozen for 2-3 months, making it an excellent make-ahead dessert option.
Q3. What’s the secret to achieving a smooth, creamy texture in this no-bake cheesecake? Using room temperature cream cheese and gently folding in the whipped topping are key to achieving a smooth, creamy texture. Also, make sure to chill the cheesecake for at least 4 hours before serving.
Q4. Can I use different types of cookies for the crust? Absolutely! While vanilla wafers are traditional, you can experiment with graham crackers, chocolate wafers, or even cookies like Golden Oreos or Pecan Sandies for different flavor variations.
Q5. How should I store leftover cheesecake? Store the cheesecake in an airtight container or tightly wrapped with plastic wrap in the refrigerator. It will stay fresh for 3-5 days. For longer storage, you can freeze it for up to 2-3 months.