Perfect Black Forest Cake Recipe: A Baker’s Secret Guide (Tested 50+ Times)
Black forest cake recipe testing has been my passion project for years. This iconic German dessert, also known as “Schwarzwälder Kirschtorte,” was a staple during my childhood, and I’ve spent countless hours perfecting my version of this classic treat.
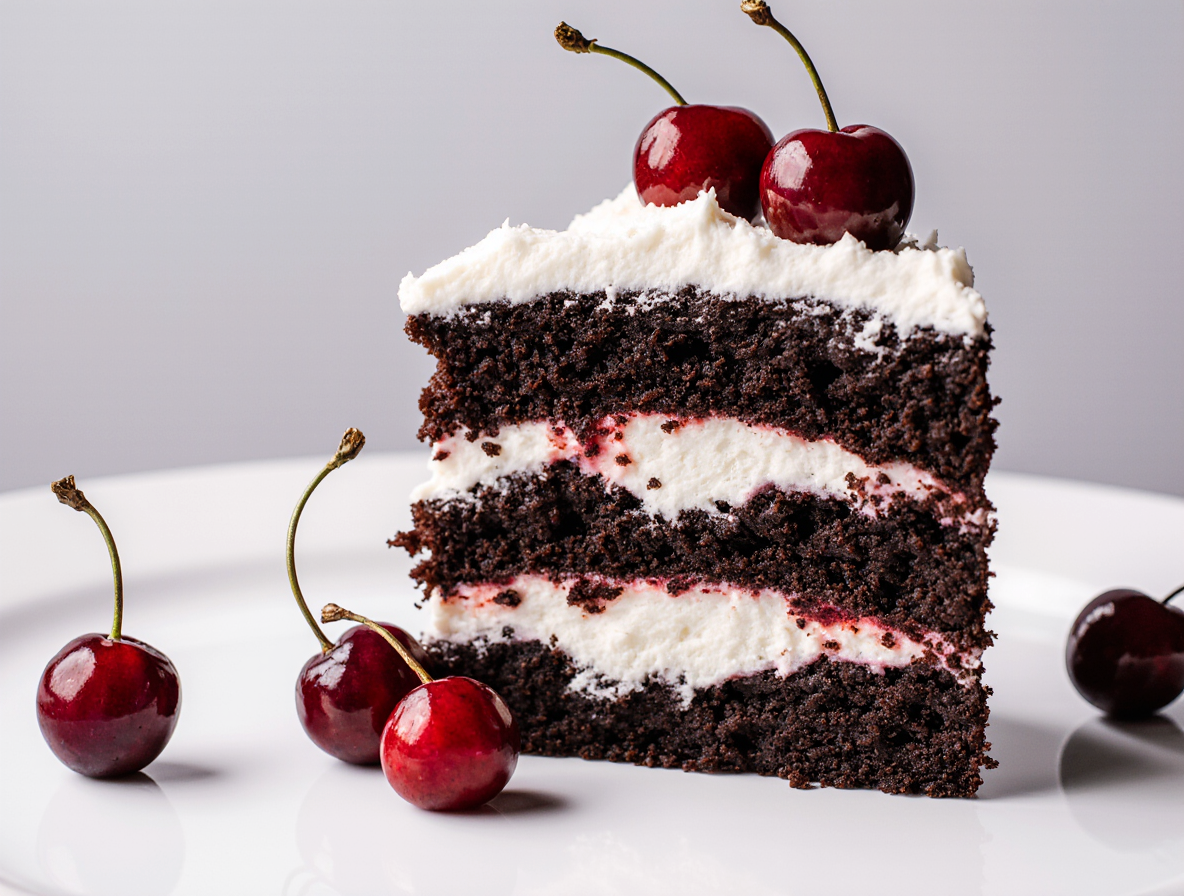
After testing and refining the traditional black forest cake recipe over 50 times, I’ve created what I believe is the best black forest cake recipe possible. The authentic black forest cake recipe features four rich chocolatey layers, a pound of kirsch-infused cherries, and light whipped cream. Additionally, if you follow my method for how to make black forest cake, each generous slice will contain about one teaspoon of kirsch, giving it that distinctive flavor that true connoisseurs appreciate. This decadent dessert combines the essential black forest cake ingredients: chocolate sponge cake layers, cherry filling, whipped cream, and dark chocolate – all working together to create a gateau that remains perfectly delicious even on the fourth day.
Choosing the Right Ingredients for Authentic Flavor
Selecting the right ingredients makes all the difference between an ordinary chocolate cake and an authentic Schwarzwälder Kirschtorte. Through my testing process, I’ve discovered which components create that perfect balance of flavors and textures that define a true black forest cake.
Traditional vs. modern black forest cake ingredients
The original black forest cake recipe features three main components: chocolate sponge cakes, cherries, and whipped cream. In contrast, modern interpretations often add extra elements like chocolate ganache or cream cheese in the frosting for added richness. Some contemporary versions even incorporate a crunchy biscuit base with chocolate mousse and vanilla Bavarian cream. Nevertheless, the authentic recipe relies on its simplicity, with the sponge moistened by cherry syrup to create that distinctive texture and flavor profile.
Why kirsch is essential (and what to use if you skip it)
Kirsch, or Kirschwasser, isn’t just a flavoring—it’s the soul of this cake. This clear, unaged cherry brandy comes from double-distilled fermented juice of black Morello cherries. The cake actually gets its name from this distinctive liqueur made in the Black Forest region. Kirsch combines sweet and slightly sour cherry notes with an almond-like undertone and mild bitterness that adds remarkable depth.
However, for a non-alcoholic version, consider these alternatives:
- Cherry juice (the closest flavor match)
- Almond extract (use sparingly)
- Orange juice for moisture
Best cherries to use: fresh, frozen, or jarred?
After extensive testing, I’ve found jarred cherries work best. While fresh cherries seem appealing, jarred cherries provide better texture and consistency. Specifically, Morello or sour cherries in light syrup create the ideal balance. Furthermore, the syrup from the jar serves as an excellent base for the cherry soaking syrup. Canned dark sweet cherries in heavy syrup can work well too, but avoid maraschino cherries completely—they would be a terrible choice.
Cocoa powder vs. chocolate: what gives the best sponge?
My experiments revealed that a combination of unsweetened chocolate and Dutch-processed cocoa powder creates the ideal chocolate sponge. The unsweetened chocolate provides cocoa solids and cocoa butter that rounds out the flavor, while Dutch-processed cocoa powder contributes intensity and a deep, dark color. For authentic texture, use Dutch-processed cocoa powder as this is what European recipes typically call for.
Whipped cream or buttercream: which is more authentic?
Whipped cream is undoubtedly the authentic choice for a traditional black forest cake. The light texture of whipped cream perfectly complements the rich chocolate sponge and tangy cherries. Consequently, this creates a balanced dessert that isn’t overly sweet or heavy. For best results, stabilize your whipped cream by adding sugar and beating until stiff peaks form. This helps maintain the cake’s structure and prevents the layers from sliding.
Step-by-Step: How to Make the Perfect Chocolate Sponge
Creating the perfect chocolate sponge requires precision and technique. Throughout my testing journey, I’ve discovered that even with the best ingredients, improper execution can ruin your black forest cake. Let me share my tested method for achieving that ideal texture every time.
Preparing your pans and preheating the oven
The foundation of a successful black forest cake starts with proper preparation. Initially, preheat your oven to 325°F-350°F (160°C-177°C), depending on whether you’re using a fan-assisted oven. For authentic results, prepare two 8-inch or three 6-inch cake pans.
Rather than using cooking spray, I’ve found dusting with cocoa powder produces superior results. First, grease your pans with butter, then dust thoroughly with cocoa powder, tapping out any excess. Alternatively, line the bottoms with parchment paper circles while leaving the sides ungreased – this allows the cake to climb properly during baking.
Whipping eggs for volume: the key to sponge success
The distinguishing characteristic of traditional black forest cake is its light, airy sponge – achieved primarily through properly whipped eggs. Beat eggs and sugar together until the mixture triples in volume and becomes pale. This process typically takes 7-8 minutes on high speed.
A simple test confirms readiness: lift your beater and draw a figure “8” with the batter. If the figure remains visible for 10 seconds without sinking, you’ve achieved the perfect consistency.
Folding in dry ingredients without deflating
Prior to incorporating dry ingredients, sift them together two or three times. This eliminates lumps and aerates the flour and cocoa powder. When folding them into your egg mixture, use a gentle technique:
Carefully add the dry ingredients in thirds, using a spatula to fold with a sweeping motion from bottom to top. Stop folding once no streaks remain – overmixing will deflate your batter and result in a dense cake.
Adding butter or oil: when and how
Once dry ingredients are incorporated, gently fold in melted butter or oil. The butter should be warm but not hot. For best results, mix a small portion of batter with the butter first, then fold this mixture back into the main batter. This technique prevents the heavy fat from deflating your carefully whipped eggs.
Baking and cooling tips for even layers
Pour the batter immediately into prepared pans. Run a toothpick through to release large air bubbles and tap pans gently on the counter. Bake until the tops spring back when lightly touched or a toothpick comes out clean.
Upon completion, cool the cakes in their pans for 10 minutes before turning them out onto a wire rack. Some bakers recommend cooling sponge cakes upside down for the first 30 minutes to maintain maximum volume.
Building the Layers: Syrup, Filling, and Cream
The assembly stage is where your black forest cake truly comes to life. After creating perfect chocolate layers, it’s time to transform them into a magnificent dessert by adding moisture, flavor, and structure.
Making cherry syrup with or without kirsch
Excellent cherry syrup begins with reducing the liquid from your jarred cherries. In a small saucepan, simmer the cherry syrup with sugar until it reduces to about half its original volume. For the authentic version, stir in 1-2 tablespoons of kirsch after removing from heat. Alternatively, substitute pure cherry juice or simply omit the alcohol entirely for a family-friendly version.
Creating a thick cherry filling that holds
For a filling that won’t slide out between layers, drain your cherries thoroughly using a slotted spoon. Moreover, some recipes recommend thickening the cherry mixture by combining sugar and cornstarch with heavy cream, simmering until it thickens. This stabilized filling prevents soggy layers and maintains the cake’s structure.
Whipping cream to stiff peaks (and how to stabilize it)
Start with everything cold—bowl, beaters, and cream. Beat heavy cream until soft peaks form, subsequently add powdered sugar and vanilla, continuing to beat until stiff peaks develop. For extra stability, incorporate a teaspoon of bloomed and melted gelatin or 2-8 ounces of softened cream cheese.
Layering technique: syrup, cream, cherries, repeat
The perfect assembly follows this sequence:
- Place cake layer on stand and brush generously with cherry syrup
- Spread approximately 1 cup of whipped cream, leaving a small border
- Arrange half the cherries in a single layer
- Add next cake layer and repeat
Always brush each layer with syrup—this step is essential both for flavor and moisture.
Common mistakes to avoid during assembly
Rushing the assembly process leads to disaster. Essentially, these errors will ruin your cake:
- Cutting cake before it’s properly chilled (minimum 3-4 hours)
- Overwhipping cream until it becomes grainy
- Using warm components that cause cream to melt
- Skimping on the cherry syrup soaking step
- Overloading with cherries, making the cake unstable
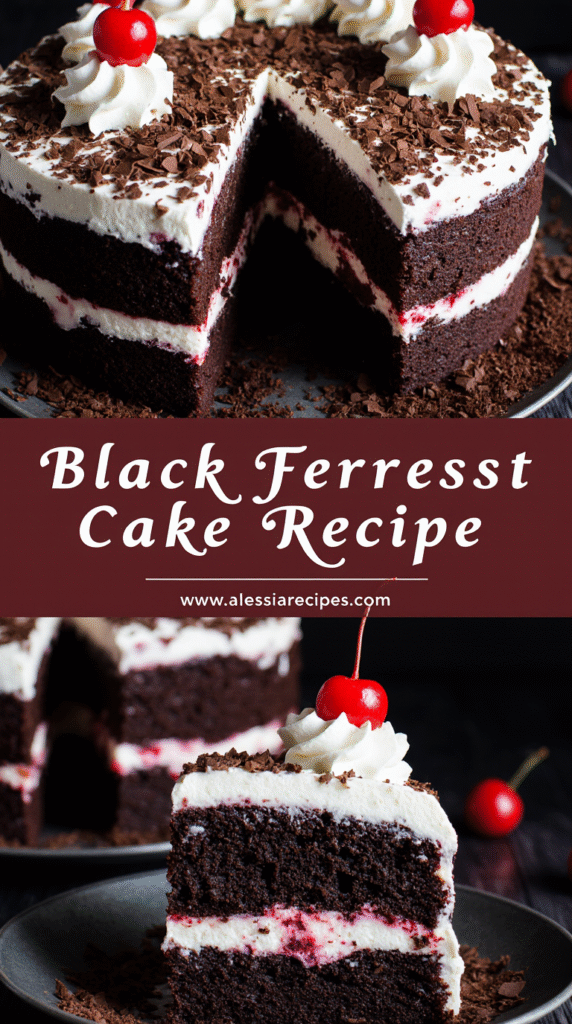
Finishing Touches: Decoration and Storage Tips
The visual appeal of your black forest cake deserves as much attention as its flavor. Those final decorative elements transform a good cake into a showstopper, besides ensuring proper storage extends its shelf life.
How to make chocolate shavings or bark
For elegant chocolate shavings, use a vegetable peeler against a block of quality chocolate. Working with cold chocolate prevents melting, thus dip your hands in cold water or refrigerate the chocolate between attempts.
Alternatively, create dramatic chocolate bark by melting chocolate and spreading it thinly on parchment paper. Roll the paper (ensuring chocolate touches only paper), refrigerate for 30 minutes, thereafter unroll to create beautiful shards. For convenience, you can freeze the chocolate for 20 minutes instead.
Piping whipped cream rosettes like a pro
Stabilized whipped cream holds its shape beautifully. First, chill your mixing bowl and whisk attachment 15 minutes beforehand. Following whipping to soft peaks, add powdered sugar and continue beating until stiff and spreadable.
For professional-looking rosettes, use a piping bag fitted with a 1M star tip. Pipe 12 evenly spaced swirls around the cake’s edge, afterwards top each with a cherry for that iconic finish.
Best cherries for topping: maraschino vs. fresh
Reserve 12 perfect cherries with stems for decoration. Though maraschino cherries provide vibrant color, fresh cherries offer authentic flavor. Generally, choose cherries that complement your overall presentation—stem-on cherries create a more elegant appearance.
How long to chill before serving
Allow your assembled cake to chill for at least 4 hours, though overnight resting delivers superior results. This resting period isn’t merely for stability—it allows flavors to meld and the syrup to fully penetrate the cake. Notably, serve the cake at room temperature for optimal flavor appreciation.
Storing leftovers and making ahead
Store your black forest cake in the refrigerator in an airtight container. The cake remains fresh for 3-4 days when properly stored.
Individual components can be prepared ahead: cake layers can be frozen for months, and cherry filling prepared days in advance. Indeed, many elements benefit from preparation ahead of time—just assemble and frost on serving day for the freshest results.
Conclusion
After 50+ attempts at perfecting this iconic German dessert, I can confidently say this black forest cake recipe stands as a testament to tradition and flavor. The combination of rich chocolate sponge, kirsch-infused cherries, and light whipped cream creates a harmonious balance that remains delicious for days after baking.
My journey to master this cake taught me that success lies equally in quality ingredients and proper technique. Certainly, the authentic touch of kirsch makes a significant difference, though suitable alternatives exist for alcohol-free versions. Similarly, jarred Morello cherries offer consistency that fresh ones simply cannot match.
Perhaps the most critical lesson learned throughout my testing involves the chocolate sponge. The perfect black forest cake demands attention to detail—properly whipped eggs for volume, gentle folding of ingredients, and careful temperature control. These seemingly small steps differentiate an ordinary chocolate cake from an extraordinary Schwarzwälder Kirschtorte.
Beyond taste, the visual appeal matters tremendously. Those chocolate shavings, perfectly piped rosettes, and carefully placed cherries transform your creation into a showstopper. Additionally, patience proves vital during assembly and chilling, allowing flavors to meld beautifully.
This labor of love might require time and attention, but the end result justifies every minute spent. Whether you bake this cake for a special occasion or simply to treat yourself, each slice offers that perfect balance of chocolate richness, cherry tanginess, and cream lightness that has made this dessert beloved worldwide.
Take your time with each step, enjoy the process, and soon you’ll bite into a slice of black forest cake that rivals those found in the finest German bakeries. This cake embodies the perfect marriage of tradition and technique—a timeless classic worth mastering.
FAQs
Q1. How long does a Black Forest cake stay fresh? When stored in the refrigerator, a Black Forest cake typically maintains its quality for 3-4 days. For longer storage, you can freeze it for up to 2-3 months if properly wrapped.
Q2. Can I make a Black Forest cake in advance? Yes, you can prepare the cake layers 1-2 days ahead of assembly. Store them at room temperature, wrapped tightly in plastic wrap. Assemble the cake with the cherry syrup, filling, and whipped cream on the day you plan to serve it.
Q3. What makes a Black Forest cake authentic? An authentic Black Forest cake, or Schwarzwälder Kirschtorte, originates from Germany’s Black Forest region. It traditionally contains layers of chocolate sponge cake, whipped cream, cherries, and most importantly, Kirschwasser (cherry brandy), which gives it its distinctive flavor.
Q4. How do you stabilize whipped cream for a Black Forest cake? To stabilize whipped cream, you can add a small amount of gelatin or cream cheese. For every cup of heavy cream, use 1/2 teaspoon of gelatin bloomed in cold water and melted, or 2-8 ounces of softened cream cheese. This helps the cream hold its shape and prevents it from melting quickly.
Q5. What type of cherries work best for a Black Forest cake? Jarred Morello or sour cherries in light syrup are ideal for Black Forest cake. They provide the best texture and flavor balance. Canned dark sweet cherries can also work well. Avoid using maraschino cherries in the filling, as they’re too sweet and lack the authentic flavor.