How to Make the Perfect Turkey Cheddar Melt (Better Than Your Local Deli)
Turkey cheddar melt sandwiches combine comfort and convenience in one delicious package. When I’m craving something satisfying yet quick to prepare, this gourmet grilled cheese never disappoints with its impressive 23g of protein and rich, melty texture.
In fact, a well-crafted turkey melt sandwich goes beyond basic deli fare. We’ve experimented with countless turkey melt recipes over the years, from the indulgent bacon turkey melt with its crispy texture contrast to the tangy sourdough turkey melt topped with creamy avocado. Not only can these be prepared in under 15 minutes, but they also provide the perfect opportunity to use leftover deli turkey.
Throughout this guide, I’ll share my secrets for creating the ultimate homemade turkey melt that surpasses anything you’d find at your local deli. From choosing the perfect cheese for superior melt and flavor to the surprising advantage of using mayonnaise instead of butter for a lighter, perfectly golden exterior—these tips will transform your sandwich game forever.
Choosing the Right Ingredients for a Perfect Turkey Melt
The foundation of any exceptional turkey melt lies in selecting quality ingredients that work harmoniously together. From the bread that provides structure to the cheese that creates that perfect pull, each component plays a crucial role in elevating your sandwich beyond basic deli fare.
Best bread types for texture and flavor
Sourdough bread stands out as a premier choice for turkey melts, offering a distinctive tang and interesting texture that holds up well to melting cheese and fillings. The slight acidity cuts through the richness of the cheese and meat, creating a balanced bite. Furthermore, ciabatta loaves provide an excellent alternative with their airy interior and crusty exterior, making them particularly suitable for warm sandwiches.
Rustic artisanal breads add character to your turkey melt sandwich, though ensure the slices aren’t too thick (which prevents proper cheese melting) or too thin (which gets squished by fillings). Whole grain seedy breads bring nutritional value and textural contrast, primarily when paired with smoother fillings like avocado.
Cheese that melts well and adds flavor
The ideal turkey cheddar melt combines cheeses with different properties – one for superior meltability and another for robust flavor. Specifically, mild or medium cheddar melts better than sharp varieties, which can turn oily when heated. For the perfect cheese pull, consider these options:
- Monterey Jack: Offers a mild, buttery flavor with excellent melting properties
- Colby or Colby-Jack: Provides good melt with a slight tang
- Havarti: A semi-soft Danish cheese that melts beautifully
- Fontina: Creates that gooey, stringy cheese pull of your dreams
Essentially, freshly sliced cheese from a block or deli counter significantly outperforms pre-packaged slices in both taste and texture.
Turkey: deli slices vs. leftover roast
High-quality deli turkey from an actual counter typically surpasses pre-packaged varieties, with smoked turkey adding extra dimension to your sandwich. Accordingly, leftover holiday turkey offers an exceptional alternative – simply slice it thinly and possibly warm it slightly longer on a lower heat if the pieces are thicker than standard deli cuts.
For the ambitious home cook, roasting your own turkey breast is surprisingly easy and affordable. The secret is ample seasoning and avoiding overcooking (ideally using a probe thermometer to keep it under 150°F).
Optional add-ins: bacon, spinach, tomato, avocado
These complementary ingredients transform a simple turkey melt into something extraordinary. Crispy bacon adds salty crunch, while fresh spinach contributes color, nutrition, and subtle flavor. Ripe tomatoes bring juiciness (though consider removing seeds if packing for later), and avocado adds creamy richness.
Other creative additions include caramelized onions, sun-dried tomatoes, or even green chiles for a spicy kick. The combinations are virtually endless, allowing you to customize your turkey melt sandwich to your precise taste preferences.
Step-by-Step Guide to Assembling Your Turkey Cheddar Melt
Mastering the assembly process transforms ordinary ingredients into an extraordinary turkey cheddar melt. Let’s dive into the precise steps that make all the difference between a mediocre sandwich and deli-beating perfection.
Layering order for optimal melt and crunch
The secret to a perfectly melted sandwich lies in strategic layering. Begin with a sturdy slice of bread as your foundation, then follow this proven sequence:
- Apply condiments directly to bread
- Add cheese as the next layer (this creates a moisture barrier)
- Layer turkey slices evenly
- Add any vegetables or additional ingredients
- Place another slice of cheese on top
- Finish with the second slice of bread, condiment-side facing inward
This arrangement ensures the cheese melts properly while keeping the bread from becoming soggy. For an even better melt, consider placing cheese on both sides of the turkey, creating a protective envelope that traps heat and promotes optimal melting.
How much of each ingredient to use
Balance is crucial for the perfect turkey cheddar melt:
- Turkey: 2-4 slices (approximately ¼ pound) per sandwich
- Cheese: 1-2 ounces total (typically 1-2 slices)
- Bread: 2 medium slices per sandwich
- Condiments: 1-2 tablespoons total (½-1 tablespoon per side)
- Additional ingredients: Use restraint—3 strips of bacon, 2-3 tomato slices, or ¼ cup of spinach provides flavor without overwhelming
Remember, overstuffing prevents proper melting and makes eating messy. The goal is harmony between ingredients, not competition.
Tips for spreading sauces evenly
Properly applied condiments make a substantial difference. Spread mayonnaise, mustard or special sauces in a thin, even layer reaching all the way to the edges of the bread. This technique ensures every bite contains the perfect amount of flavor and prevents dry spots.
Additionally, consider this professional technique: mix complementary condiments separately before applying them. For instance, blend mayonnaise with red wine vinegar and black pepper for a tangy spread that elevates your turkey melt beyond basic deli fare.
Cooking Techniques That Make It Better Than the Deli
The final magic happens during the cooking process, where heat transforms your carefully layered ingredients into a cohesive, mouthwatering turkey cheddar melt. Mastering these techniques is what truly sets your homemade sandwich apart from standard deli offerings.
Skillet vs. panini press vs. oven
Each cooking method offers distinct advantages for your turkey melt sandwich. A large cast-iron skillet over medium heat provides excellent control and traditional results—simply toast each side for about 5 minutes, pressing lightly with a spatula to ensure full contact with the pan. Subsequently, place finished sandwiches on a wire rack to prevent sogginess.
Alternatively, a panini press simultaneously cooks both sides, creating those coveted grill marks while applying even pressure that helps ingredients meld together. This method saves time and creates a more compact, easy-to-eat sandwich.
For batch cooking, the oven broiler works remarkably well. Place your assembled turkey melts on a sheet pan and broil for 5-7 minutes until the bread turns golden and cheese bubbles. Moreover, some chefs place finished sandwiches on chopsticks or a cooling rack afterward to prevent steam from making the bottom soggy.
How to get golden, crispy bread
The secret to perfectly crispy bread lies in the “low and slow” approach—cook your turkey cheddar melt for 2-4 minutes per side over low to medium-low heat. Additionally, covering the skillet with a lid after adding cheese gives it a head start on melting while you achieve that golden exterior.
Melting cheese without burning the bread
The ice cube trick works wonders here: After browning both sides of your sandwich, lower the heat to minimum, move the sandwich to one side of the pan, and add a small ice cube to the opposite side. Immediately cover the pan—as the ice melts, it creates steam that perfectly melts the cheese without burning the bread.
Using butter vs. mayo on the outside
Both options yield excellent results, nevertheless, they offer different benefits. Butter provides that classic rich, nutty flavor as milk solids brown, whereas mayonnaise has a higher smoke point (450°F compared to butter’s 350°F), making it less likely to burn. Furthermore, mayo spreads easily straight from the refrigerator, unlike butter which requires softening.
For the ultimate turkey melt sandwich, consider combining equal parts butter and mayonnaise for next-level flavor profile and perfect golden crust. Whichever fat you choose, ensure complete coverage from crust to crust for even browning.
Creative Variations and Add-Ons to Try
Once you’ve mastered the basic turkey cheddar melt, it’s time to explore exciting variations that elevate this sandwich from delicious to extraordinary. These creative twists offer unique flavor combinations while maintaining the comfort-food appeal of the classic.
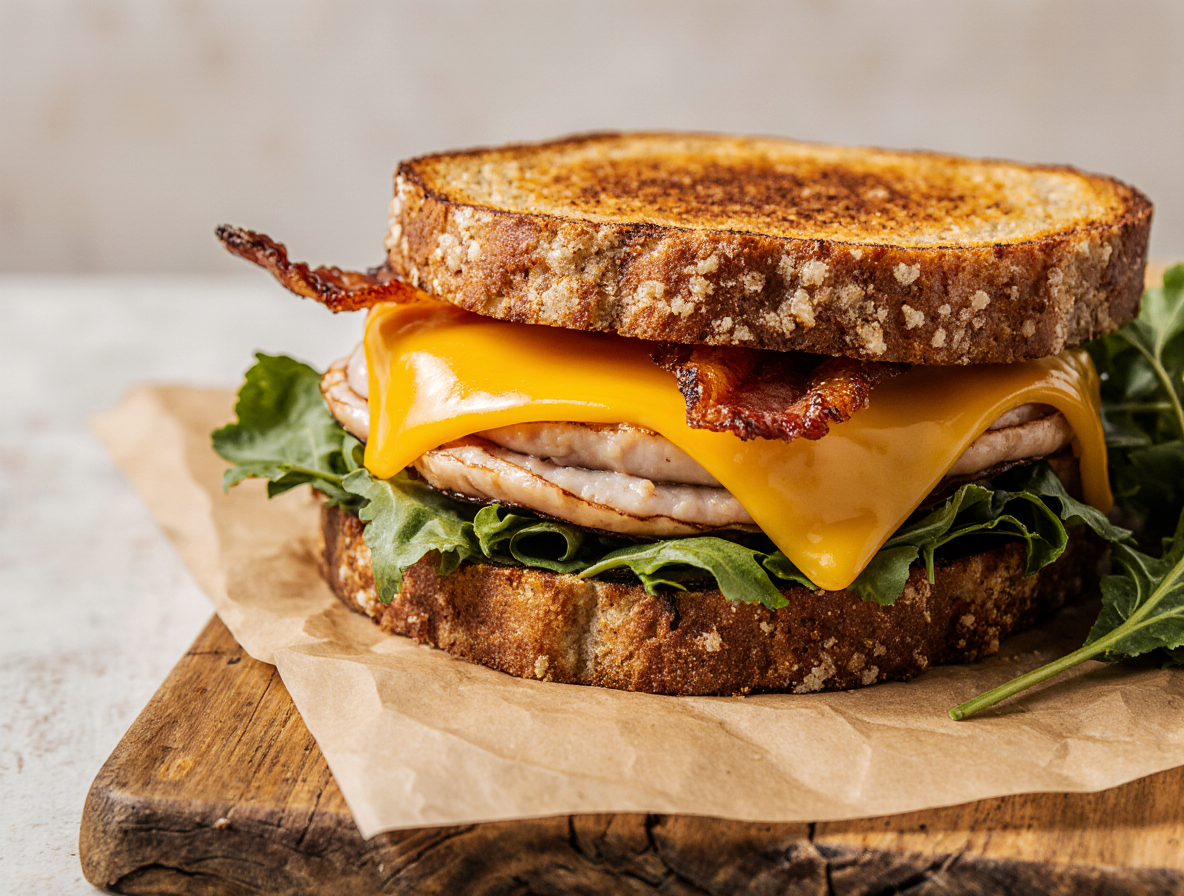
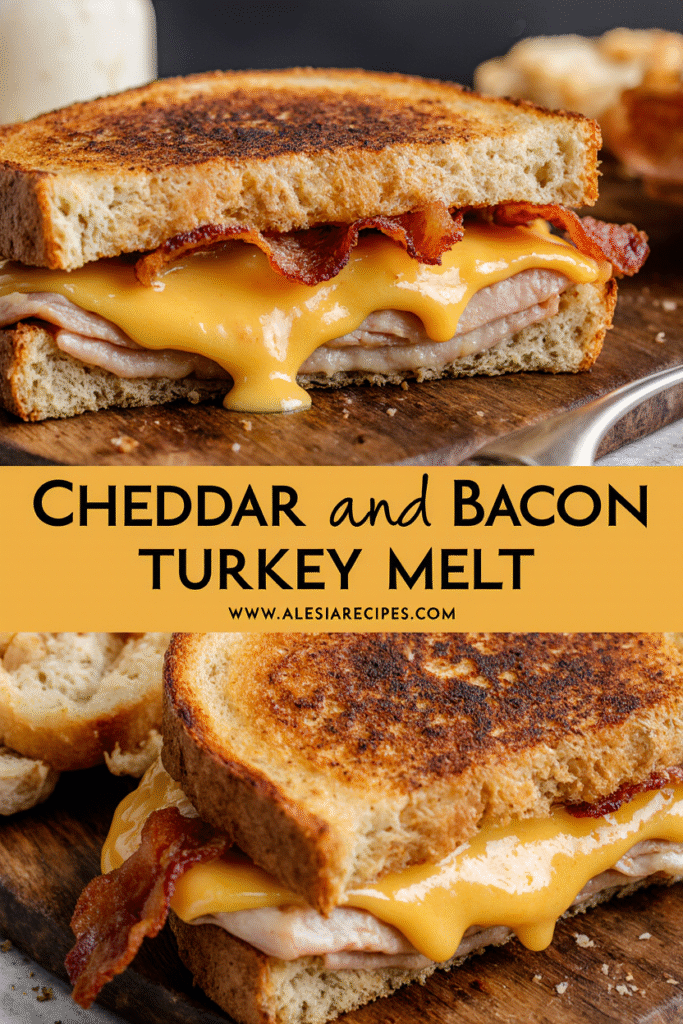
Bacon turkey melt and turkey bacon melt options
Despite sounding similar, these are distinctly different sandwiches. A bacon turkey melt adds crispy bacon strips to complement the turkey, whereas a turkey bacon melt features both ingredients as equal stars. For an indulgent version, try caramelized onions alongside bacon and turkey with cheddar cheese. This combination delivers smoky, sweet, and savory flavors in every bite. Alternatively, experiment with adobo sauce from chipotle peppers mixed into mayonnaise for a smoky kick.
Sourdough turkey melt with avocado
Sourdough bread provides the perfect tangy foundation for creamy avocado and savory turkey. The textural contrast between crusty bread, creamy avocado, and melty cheese creates a sandwich that satisfies multiple senses. For optimal results, smash about 1/3 of an avocado directly onto the bread before adding other ingredients. Certainly consider adding fresh spinach or leafy greens for nutritional value and color contrast.
Spicy twist: green chiles or hot sauce
Hatch green chiles transform an ordinary turkey melt into something special. Layer 2-3 roasted, seeded chile halves between your turkey and cheese for incredible flavor. Buffalo sauce offers another spicy option—simply toss your turkey slices in the sauce before layering. Furthermore, sriracha mixed with honey creates a sweet-heat combo that perfectly balances the richness of the cheese.
Vegetarian version with plant-based turkey
Plant-based turkey alternatives have come a long way, making vegetarian melts entirely possible. Pair your favorite plant-based turkey with vegan cheese (which melts surprisingly well), avocado, and vegan mayo on whole-grain bread. Since plant-based ingredients often need flavor boosts, consider adding mustard or pesto to enhance the overall taste profile.
Conclusion
Throughout this guide, we’ve explored what makes a truly exceptional turkey cheddar melt sandwich. Certainly, anyone can stack turkey and cheese between bread, but the difference between mediocre and magnificent lies in the details.
Quality ingredients form the foundation of sandwich excellence. Fresh-sliced cheese melts better than pre-packaged options, while sourdough or artisanal breads provide the perfect canvas. Meanwhile, proper layering techniques create that ideal bite with cheese strategically placed to protect bread from moisture.
Cooking methods matter significantly. The low-and-slow approach ensures perfectly golden bread without burning, while the ice cube trick melts cheese beautifully. Additionally, mayo instead of butter offers easier spreading and a higher smoke point for consistent results.
Beyond basics, personalization transforms your sandwich. Bacon adds savory crunch, avocado brings creamy richness, and spicy elements like green chiles create exciting flavor dimensions. After all, the best turkey melt reflects your unique preferences.
Most importantly, these techniques empower you to create sandwiches far superior to anything from your local deli. Now that you understand the principles behind perfect turkey melts, you’ll never settle for ordinary sandwiches again. Your next homemade turkey cheddar melt awaits – crispy, gooey, and absolutely delicious.
FAQs
Q1. What’s the ideal cheese for a turkey melt sandwich? For a perfect turkey melt, use a combination of cheeses. Mild or medium cheddar melts well, while Monterey Jack or Colby offer excellent meltability and flavor. Freshly sliced cheese from a block or deli counter performs better than pre-packaged slices in both taste and texture.
Q2. How can I achieve a perfectly crispy exterior on my turkey melt? Use the “low and slow” approach by cooking your sandwich for 2-4 minutes per side over low to medium-low heat. For an even crispier result, try spreading mayonnaise instead of butter on the outside of the bread, as it has a higher smoke point and spreads more easily.
Q3. What’s the best way to layer ingredients in a turkey melt? Start with condiments on the bread, followed by a layer of cheese, then turkey slices, any additional ingredients, another layer of cheese, and finally the top slice of bread. This layering order ensures proper melting and prevents the bread from becoming soggy.
Q4. Can I make a delicious vegetarian version of a turkey melt? Absolutely! Use plant-based turkey alternatives paired with vegan cheese, avocado, and vegan mayo on whole-grain bread. To enhance flavor, consider adding mustard or pesto. This combination creates a satisfying vegetarian melt that rivals its meat-based counterpart.
Q5. What are some creative variations to try with a turkey melt? Experiment with add-ons like crispy bacon, creamy avocado, or spicy green chiles. Try a sourdough turkey melt with avocado for a tangy twist, or add a kick with hot sauce or sriracha mixed with honey. These variations can transform your basic turkey melt into a gourmet sandwich experience.