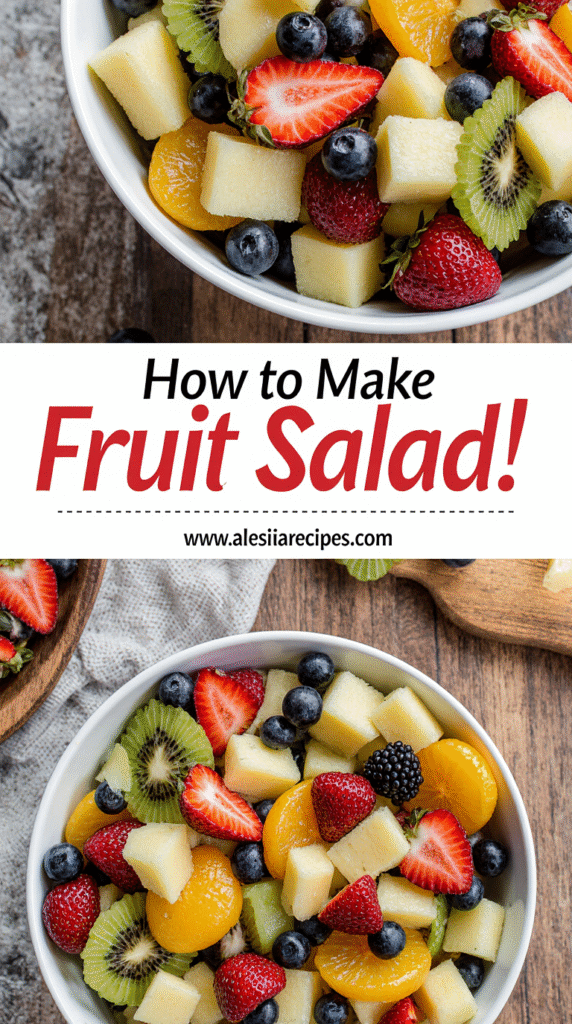
How to Make Fruit Salad: Chef-Approved Secret for Perfect Results
Bright, colorful, and incredibly delicious—learning how to make fruit salad properly transforms a simple dish into something extraordinary. Although chopping fresh fruit takes about 30 minutes, the results are certainly worth it. Every time I serve this crowd-pleasing dish, my family immediately asks when I’ll make it again.
What makes homemade fruit salads the best? While store-bought options exist, creating your own means controlling the fruit salad ingredients and achieving perfect ripeness in every bite. Additionally, with 186% of your daily Vitamin C per serving, this refreshing treat is as nutritious as it is delicious. In this guide, I’ll share my step-by-step process for creating a fruit salad that serves 10-12 people, along with chef-approved secrets that elevate ordinary ingredients into something special. Whether you’re preparing for a party or simply want to enjoy a healthy snack that lasts 3-4 days in the refrigerator, these techniques will help you create perfect results every time.
Choosing the Best Fruit for Fruit Salad
The foundation of any memorable fruit salad starts with selecting the perfect fruits. Your choices determine not only the flavor but also how well your salad holds up over time. Let’s explore how to pick fruits that will create a harmonious blend of flavors, textures, and visual appeal.
Seasonal vs. year-round fruits
Choosing seasonal fruits offers significant advantages for your fruit salad. Seasonal options typically deliver superior flavor because they’ve ripened naturally in their ideal growing conditions. Furthermore, these fruits tend to be less expensive since they don’t require long-distance shipping or special growing environments.
In spring, look for strawberries, mangoes, pineapples, and honeydew melons. Summer provides an abundance of options including plums, peaches, most melons, blackberries, raspberries, figs, and nectarines. Fall brings excellent pears, apples, persimmons, and grapes, while winter is ideal for citrus and kiwi fruits.
Year-round fruits like bananas, apples, and certain berries can supplement your seasonal selections. However, these may lack the vibrant flavor of their seasonal counterparts.
Fruits to avoid for texture or color issues
Not all fruits work well in a fruit salad. Bananas brown quickly and can turn mushy, particularly problematic if you’re not serving immediately. Likewise, apples oxidize rapidly, affecting visual appeal unless treated with citrus juice.
Watermelon and cantaloupe, despite their popularity, release excessive moisture that can make your salad watery and diluted. Kiwi contains enzymes that can cause other fruits to soften prematurely.
Citrus fruits with membranes often create an unpleasant texture in fruit salads. Meanwhile, frozen fruits become soft and mushy upon thawing, releasing too much liquid that can discolor your entire salad.
Tips for ripeness and flavor balance
Identifying perfectly ripe fruit is essential for a delicious fruit salad. Look for fruits with consistent, vibrant color and pleasant aroma. Most ripe fruits yield slightly to gentle pressure without feeling mushy.
For flavor balance, consider this chef’s advice: “Imagine making a smoothie with all your chosen fruits—if they’d taste good together blended, they’ll work well in your salad”. This simple test helps prevent clashing flavors.
Balance texture by combining soft fruits (like peaches or mangoes) with crisp options (such as grapes or apples). This textural contrast makes each bite more interesting and prevents the one-dimensional “baby food” feeling of an all-soft fruit salad.
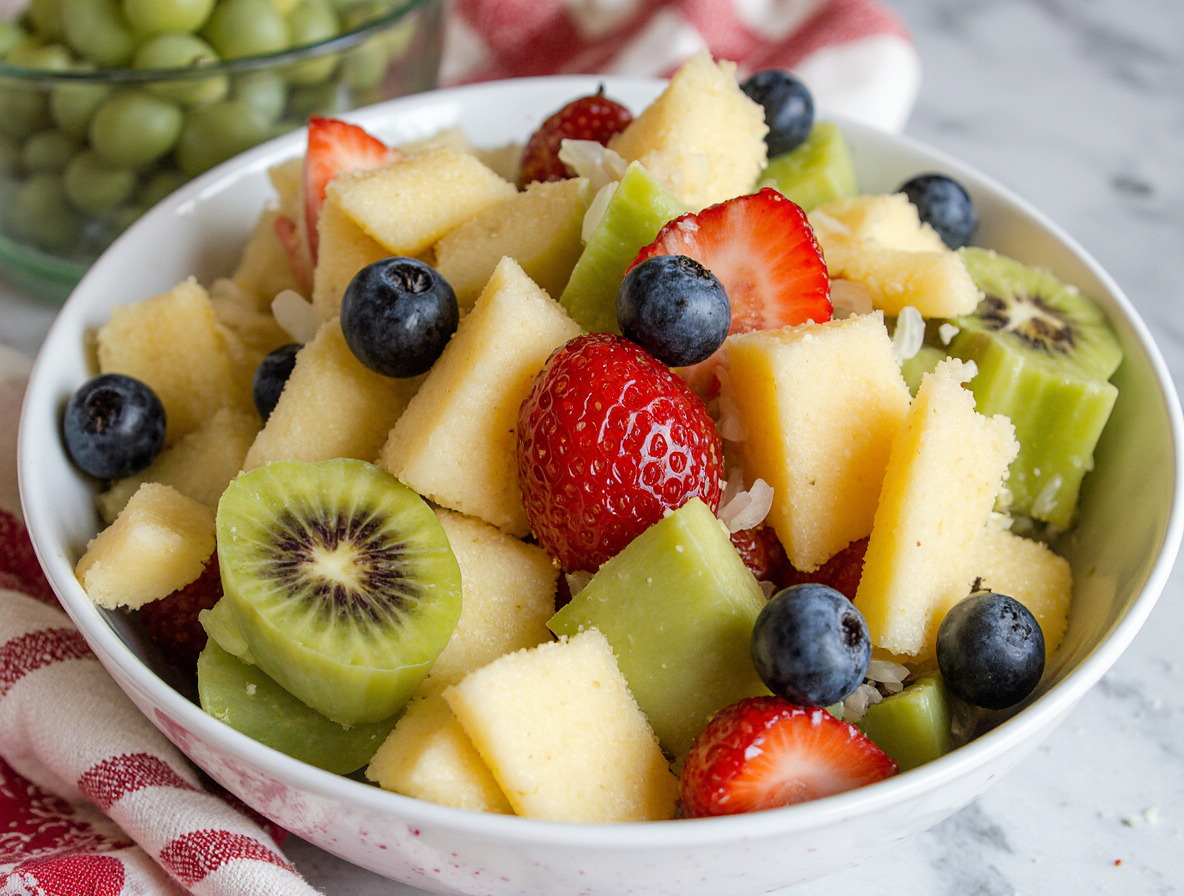
For visual appeal, incorporate fruits with different colors. Reds (strawberries), blues (blueberries), yellows (pineapple), and greens (kiwi) create an eye-catching presentation. Moreover, measure your fruits before combining to ensure balanced proportions—no one wants a bowl dominated by “filler fruit”.
How to Make Fruit Salad Step by Step
Creating a perfect fruit salad requires more than just tossing fruit in a bowl. Following these chef-approved steps will ensure delicious results every time.
1. Wash and dry the fruit properly
Start with clean hands, washing them thoroughly with soap and warm water for at least 20 seconds. Next, rinse all fruits under cold running water for a minimum of 10 seconds, ensuring the entire surface is covered. This process helps remove pesticides and dirt from the surface. Avoid using soap, detergent, or bleach solutions on produce as they can be absorbed and make you sick.
For firmer fruits, use a soft-bristle vegetable brush to scrub the surface. After washing, dry the fruit completely with clean paper towels or a designated cloth. This step is critical as excess moisture can water down your salad and prevent dressing from adhering properly.
2. Cut fruit into uniform bite-sized pieces
Cutting fruit into consistent sizes ensures even flavor distribution and easier eating. For strawberries, remove only the green top using a pointed knife. When dealing with stone fruits, cut along the center and twist both halves if ripe, or cut around the stone if firmer. Pineapple, melons, and larger fruits should be cubed into manageable chunks—approximately 1-inch pieces work well for most fruits.
3. Prepare the dressing (honey-lime or citrus glaze)
For a honey-lime dressing, whisk together 1-2 tablespoons of honey with the zest and juice of one lime. Alternatively, create a citrus glaze by combining orange juice, lemon juice, and brown sugar in a saucepan. Bring to a boil, then reduce heat and simmer for about 5 minutes until slightly thickened. Remove from heat, add vanilla extract, and allow to cool completely.
4. Combine and toss gently
Place all prepared fruit in a large glass bowl. Pour half the dressing over the fruit initially, then gently fold using a spoon or spatula rather than stirring vigorously. This technique preserves the integrity of delicate fruits. Add remaining dressing as needed, being careful not to oversaturate.
5. Chill before serving
Cover your fruit salad and refrigerate for 3-4 hours before serving to allow flavors to meld. For best results, serve within 24 hours of preparation. If including fruits that brown quickly (like bananas or apples), add them just before serving.
Chef-Approved Tips for Perfect Results
Professional chefs excel in transforming ordinary ingredients into extraordinary dishes through specialized techniques. I’ll share insider methods that instantly elevate your fruit salad from basic to restaurant-quality.
Use a microplane for zesting citrus
The secret to capturing intense citrus flavor lies in proper zesting technique. A microplane grater creates fine, even zest that distributes flavor uniformly throughout your fruit salad. When zesting, position the microplane with its underside facing you and move the citrus upward against the grater. This clever approach collects all the precious oils in one place rather than losing them to your cutting board or countertop.
Always zest before juicing your citrus, and remember to wash and thoroughly dry the fruit first. Aim to remove only the colored outer layer, avoiding the bitter white pith beneath. For maximum flavor impact, zest directly into your dressing or fruit mixture rather than onto a separate surface.
Add delicate fruits last
Timing matters significantly when making fruit salad. Add softer, delicate fruits like raspberries, ripe mangoes, and thinly sliced bananas at the final stage of preparation. These fragile ingredients break down quickly when mixed, potentially turning mushy and compromising your salad’s texture.
For bananas specifically, consider adding them immediately before serving or coating thoroughly with lemon juice to prevent browning. Alternatively, skip them entirely if your salad needs to sit for several hours.
Avoid overmixing to preserve texture
Excessive stirring is the downfall of many fruit salads. Instead of vigorously stirring with utensils, consider gently folding ingredients with clean hands for better control and less fruit damage. When using a spoon or spatula, employ a gentle lifting motion rather than stirring in circles.
For layered salads, place harder, juice-resistant fruits at the bottom and softer fruits toward the top. This strategic arrangement maintains textural integrity during storage and serving.
Use a glass bowl for presentation
Beyond its practical benefits, a transparent glass bowl dramatically enhances visual appeal by showcasing your fruit salad’s vibrant colors and thoughtful composition. The clear sides allow guests to appreciate the colorful layers and variety of ingredients before serving.
Glass also maintains temperature better than plastic alternatives, keeping your creation chilled longer during service. For an especially impressive presentation, consider a footed glass trifle bowl that elevates the display and highlights the beautiful layers.
Customizing Your Fruit Salad
The beauty of fruit salad lies in its flexibility—you can easily adapt it to suit any occasion, season, or taste preference. Once you’ve mastered the basic technique, experimenting with different combinations becomes the most enjoyable part.
Fruit swaps by season
Creating season-specific fruit salads ensures you’re always working with the freshest, most flavorful ingredients. For spring celebrations, try a “Berry Delight” mix with strawberries, bananas, and blueberries. Summer calls for a refreshing “Melon Salad” featuring watermelon, cantaloupe, and honeydew. As autumn arrives, switch to a “Waldorf Style” combination with apples, grapes, and canned mixed fruit. Throughout winter, embrace a “Tropical Fruit” blend using canned pineapple, mango, and kiwi.
Consequently, your fruit salad will always taste better when using whatever’s in season. Remember that cantaloupe and honeydew, often used as “filler fruits,” should only be included when they’re perfectly ripe and sweet.
Dressing variations (yogurt, maple syrup, etc.)
Beyond the classic honey-lime dressing, numerous alternatives can transform your fruit salad. Whenever you want a creamier option, try Greek yogurt sweetened with honey and vanilla. For a vegan alternative, substitute maple syrup for honey in your citrus dressing. Some chefs prefer using nonfat lemon yogurt as a tangy, creamy coating.
Accordingly, you might consider making a maple-lime dressing that brings out the natural flavors in your fruits. Another option is combining orange juice with maple syrup for a simple yet effective glaze.
Add-ins: mint, nuts, or coconut flakes
To elevate texture and flavor, consider thoughtful add-ins. Fresh mint provides a refreshing contrast—simply strip the leaves, tear or chop into smaller pieces, and stir into your salad. Toasted nuts add satisfying crunch; walnuts, almonds, cashews, and hazelnuts all work beautifully.
Similarly, shredded coconut transforms an ordinary fruit salad into something special. Sprinkle sweetened coconut just before serving to maintain its texture. For added interest, consider experimenting with poppy seeds, shaved coconut, or even a handful of miniature marshmallows for an ambrosia-inspired treat.
Conclusion
Making a perfect fruit salad truly becomes an art form when you follow these chef-approved techniques. Throughout this guide, we’ve explored everything from selecting the ideal fruits to mastering professional preparation methods. After trying these approaches, you’ll notice how your fruit salads transform from ordinary to extraordinary with minimal effort.
Seasonal fruit selection stands as perhaps the most crucial factor for exceptional results. Fresh, ripe fruits naturally provide superior flavor while saving money compared to out-of-season alternatives. Additionally, proper cutting techniques and gentle handling preserve the integrity of delicate ingredients, creating that perfect texture balance in every bite.
Remember that presentation matters just as much as taste. Glass bowls showcase your colorful creation while specialized tools like microplane graters extract maximum flavor from citrus zest. These small details make significant differences in your final dish.
Customization options remain endless, whether you prefer creamy yogurt dressings or zesty citrus glazes. Your fruit salad can easily adapt to any season, dietary preference, or special occasion. Feel free to experiment with different add-ins like fresh mint, toasted nuts, or coconut flakes for exciting texture variations.
My family now requests this refreshing treat regularly, appreciating both its vibrant flavors and impressive nutritional benefits. Undoubtedly, homemade fruit salad delivers a superior experience to store-bought versions, especially when prepared with these professional techniques.
Next time you’re planning a gathering or simply want a healthy snack option, give these methods a try. The extra care produces results worth sharing—though you might find your guests asking for seconds before you have the chance!
FAQs
Q1. What’s the key to creating an exceptional fruit salad? The secret lies in using seasonal, perfectly ripe fruits and cutting them into uniform bite-sized pieces. Gently toss the fruits with a light dressing, such as honey-lime or citrus glaze, and chill before serving to allow flavors to meld.
Q2. Are there any fruits I should avoid using in my fruit salad? It’s best to avoid using very ripe bananas, as they can turn mushy quickly. Watermelon and cantaloupe can make the salad watery, while citrus fruits with membranes may create an unpleasant texture. Also, be cautious with kiwi, as it contains enzymes that can soften other fruits prematurely.
Q3. How can I prevent my fruit salad from browning? To prevent browning, add fruits like apples and bananas just before serving. Alternatively, you can coat them thoroughly with lemon juice. Using a glass bowl for serving and storing can also help maintain the salad’s freshness and appearance.
Q4. What are some creative ways to customize my fruit salad? You can customize your fruit salad by experimenting with different dressings like yogurt or maple syrup-based ones. Adding fresh mint, toasted nuts, or coconut flakes can introduce interesting flavors and textures. You can also create themed salads based on seasons, using fruits that are at their peak during specific times of the year.
Q5. How long can I store my homemade fruit salad? A properly prepared fruit salad can last 3-4 days in the refrigerator. However, for the best taste and texture, it’s recommended to consume it within 24 hours of preparation. Always store it in a covered container in the refrigerator to maintain freshness.