How to Make Chicken Onigiri: Easy Japanese Rice Balls at Home
I’ve been addicted to onigiri since I was a little girl. These Japanese rice balls filled with savory chicken create the perfect balance between simple rice and flavorful ingredients, making them an irresistible snack or meal option.
Whether you’re packing lunch for work or need a nutritious on-the-go snack, chicken onigiri is incredibly versatile and satisfying. In fact, a single chicken rice ball contains approximately 171 calories, 6g of protein, and 30g of carbohydrates, making it perfect for a quick energy boost. Besides being delicious, this chicken onigiri recipe is adaptable to whatever you have in your fridge – no chicken? You can easily substitute pork, beef, or even go vegetarian with tofu or seitan. From teriyaki to buffalo-style, the possibilities for chicken onigiri fillings are endless.
In this guide, I’ll show you how to make chicken onigiri at home with simple ingredients and techniques that anyone can master. These portable Japanese rice balls are ideal for bento boxes or on-the-go munching, and I’m excited to share my favorite methods with you!
What is Chicken Onigiri?
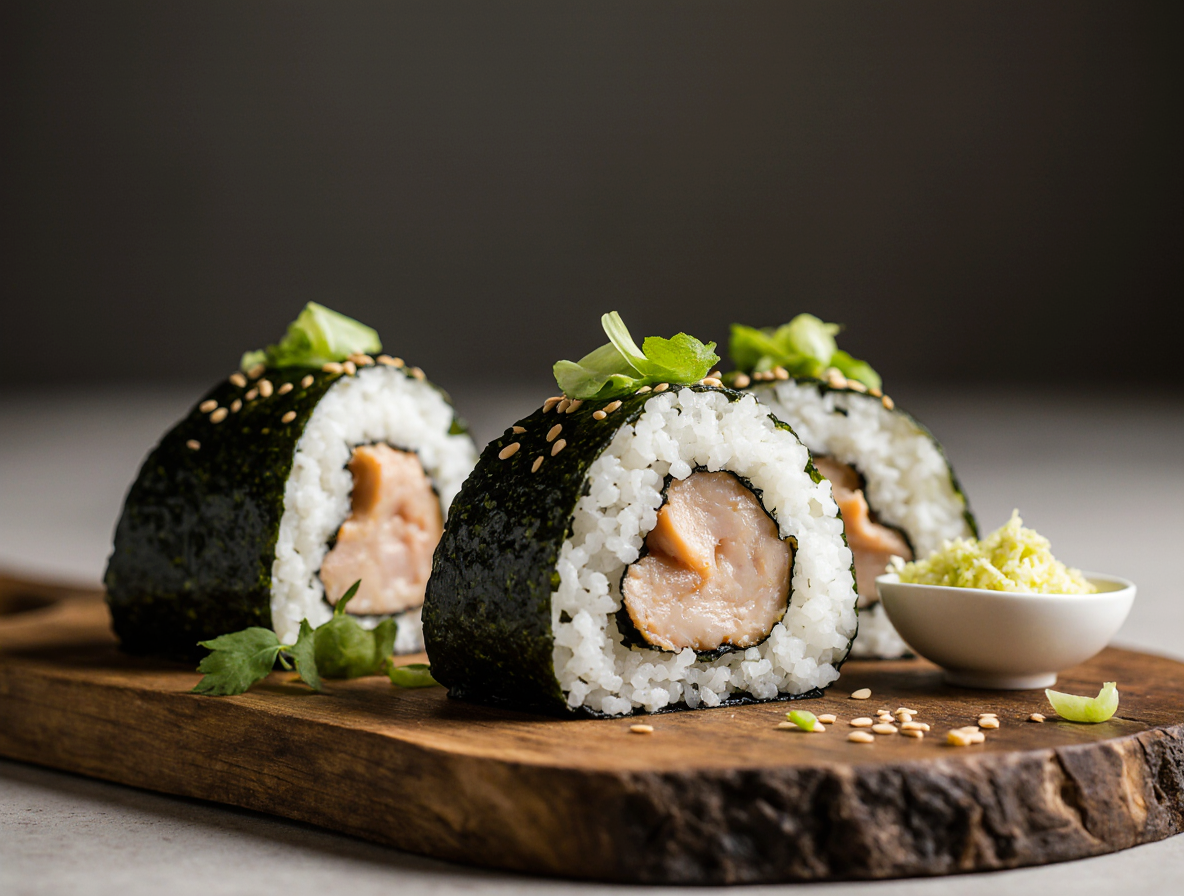
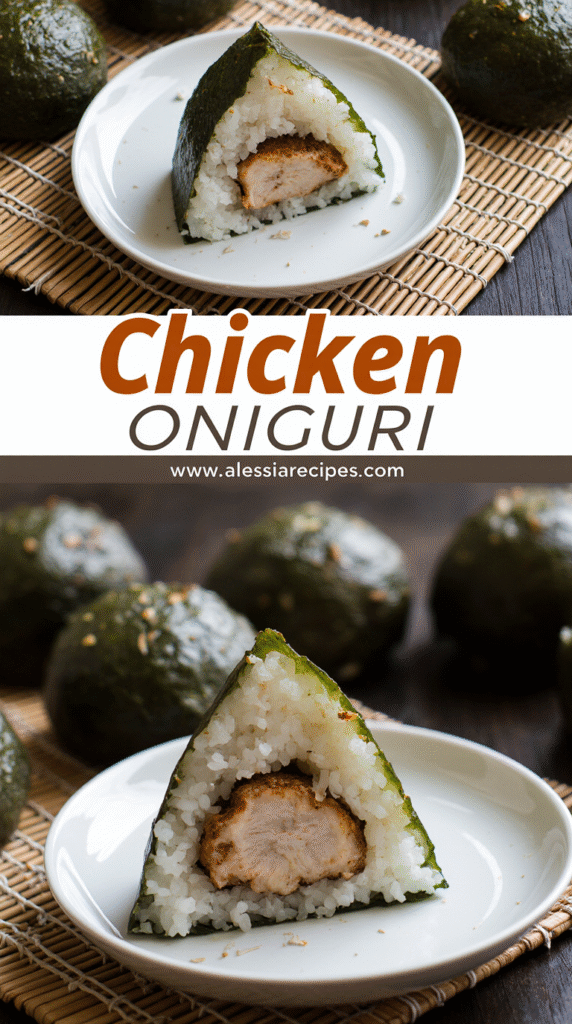
Chicken onigiri represents the essence of Japanese comfort food – a handheld rice ball typically shaped into a triangle or cylinder, often filled with savory chicken and partially wrapped in nori seaweed. Unlike sandwiches in Western cultures, onigiri serves as Japan’s original grab-and-go meal, perfect for quick energy boosts throughout the day.
How it differs from sushi
Many people mistakenly confuse onigiri with sushi, but they are distinctly different Japanese foods. The primary difference lies in the rice preparation. Onigiri uses plain steamed rice (sometimes lightly salted), while sushi contains rice seasoned with vinegar, sugar, and salt. Furthermore, onigiri originated as a way to make rice portable and easy to eat, whereas sushi was traditionally developed as a method of preserving fish. Even the name reflects this difference – “onigiri” comes from the Japanese word “nigiru,” meaning “to grasp” or “to squeeze,” referring to how it’s pressed by hand into its distinctive shape.
Why it’s a popular Japanese snack
Onigiri has earned its place as a beloved staple in Japanese cuisine for several compelling reasons. First, these rice balls offer unmatched convenience – they’re easy to eat, require no utensils, and can be transported without mess. Additionally, they provide a perfect balance of carbohydrates and protein, making them an ideal fuel source. Their prevalence throughout Japan demonstrates their cultural significance – from convenience stores (konbini) to train stations, parks, and specialized shops dedicated solely to onigiri. For children and adults alike, they represent an accessible, nourishing meal option that’s both comforting and satisfying.
Common chicken onigiri fillings
When it comes to chicken fillings for onigiri, the possibilities are truly diverse:
- Soboro chicken: Ground chicken cooked until crumbly and seasoned with a sweet-savory sauce, often with a hint of ginger
- Teriyaki chicken: Featuring the iconic trinity of soy sauce, mirin, and sugar that creates a glossy, flavorful coating
- Chicken with mayonnaise: Often combined with other ingredients like spring onions and coriander
- Yakitori-style chicken: Cooked with tare sauce (combining soy sauce, sake, and sugar) for a rich umami flavor
The beauty of chicken onigiri lies in its adaptability – almost any chicken preparation can be transformed into a delicious rice ball filling.
Ingredients and Tools You’ll Need
Preparing chicken onigiri at home requires specific ingredients and a few simple tools to achieve authentic results. Let me walk you through everything you’ll need to create these delicious Japanese rice balls in your own kitchen.
Choosing the right rice
For authentic chicken onigiri, the rice selection is crucial. Japanese short-grain rice (often labeled as sushi rice) works best because of its high starch content and sticky texture when cooked. Medium-grain rice can work in a pinch, though the result won’t be quite as cohesive. Long-grain varieties like jasmine or basmati should be avoided entirely as they’re too dry and won’t hold together properly. For best results, rinse your rice thoroughly until the water runs clear, then let it rest for 30 minutes before cooking to ensure even water absorption.
Best chicken cuts for onigiri
Thigh meat is generally preferred over breast for chicken onigiri fillings because it stays moist and flavorful. I recommend using boneless, skinless thighs cut into small pieces or shredded after cooking. Ground chicken also works exceptionally well, especially when seasoned with traditional Japanese flavors like soy sauce, mirin, and sake. Regardless of which cut you choose, make sure the chicken is fully cooked and cooled before incorporating it into your rice balls to prevent moisture issues.
Optional add-ins and sauces
Enhance your chicken onigiri with complementary ingredients such as:
- Pickled vegetables like umeboshi (pickled plum)
- Furikake (Japanese rice seasoning)
- Finely chopped green onions
- Toasted sesame seeds
- Mayonnaise (Kewpie brand if available)
For sauces, consider teriyaki, spicy mayo (mix sriracha with Japanese mayonnaise), or a simple combination of soy sauce and mirin to flavor your chicken filling.
Essential tools for shaping
While traditional onigiri is shaped by hand, several tools can help beginners:
- Rice paddle for mixing and handling the hot rice
- Bowl of salted water to dip hands (prevents sticking)
- Plastic wrap for the clean-hands method
- Triangle or ball-shaped onigiri molds for consistent results
- Nori sheets cut into strips for wrapping
- Small bowl of water for sealing edges
First-timers might prefer using molds until they develop a feel for proper density and shaping techniques.
Step-by-Step: How to Make Chicken Onigiri
Creating chicken onigiri involves several straightforward steps that, once mastered, become second nature. Let me walk you through the complete process for making these delicious Japanese rice balls at home.
1. Cook and season the rice
Start by thoroughly rinsing Japanese short-grain rice until the water runs clear. Add the rinsed rice to your rice cooker with the appropriate amount of water (typically 1:1.1 ratio for Japanese rice). After cooking, transfer the rice to a large bowl and sprinkle approximately ½ teaspoon of fine salt. Gently fold the rice with a wooden or plastic paddle to distribute the salt evenly without crushing the grains.
2. Prepare and marinate the chicken
Cut boneless chicken (preferably thigh meat) into small pieces. Place in a bowl with 2 tablespoons soy sauce, 1 tablespoon sake (or water), and minced garlic. For extra flavor, consider adding ¼ teaspoon baking soda and 1 teaspoon cornstarch. Allow the chicken to marinate for 15-20 minutes.
3. Cook the chicken and mix with rice
Heat oil in a pan over medium heat. Cook the marinated chicken until fully done, approximately 5 minutes. For more complex flavors, add vegetables like carrots and ginger during the last 2-3 minutes of cooking. Allow the chicken mixture to cool slightly before folding it into your seasoned rice.
4. Shape the rice balls by hand or mold
For hand-shaping: Wet your hands with salted water to prevent sticking. Take a handful of the chicken-rice mixture and press gently between your palms, rotating to form a triangle. For mold-shaping: Wet the mold first, add rice halfway, create a small well for filling, add more rice on top, then press firmly with the lid.
5. Wrap with nori and serve
Toast nori sheets briefly over an open flame for enhanced flavor. Cut into strips and wrap around the base of each onigiri just before serving to maintain crispness. Serve immediately or pack for later enjoyment.
Tips, Variations, and Storage
Experimentation with chicken onigiri opens a world of flavor possibilities and convenient meal prep options. Mastering a few variations and proper storage techniques will enhance your onigiri experience significantly.
Flavor variations: teriyaki, spicy mayo, soboro
Teriyaki chicken onigiri features the classic trinity of soy sauce, mirin, and sugar that creates a glossy, sweet-savory glaze coating the chicken pieces. For spicy mayo variations, simply mix Japanese mayonnaise with sriracha sauce in a bowl, creating a creamy, fiery condiment that brings the whole rice ball together. Soboro chicken—ground meat cooked until crumbly with ginger and seasonings—makes an excellent filling that can be prepared ahead and frozen in small portions.
Vegetarian and gluten-free options
Transform your chicken onigiri into vegetarian delights by substituting the meat with firm tofu or seitan marinated in the same flavorings. Edamame mixed into the rice adds color and protein. For gluten-free versions, ensure your soy sauce and seasonings are certified gluten-free. Avocado makes an excellent creamy substitute for mayonnaise in gluten-free preparations.
How to store and freeze chicken rice balls
For optimal flavor, enjoy onigiri fresh whenever possible. To freeze, wrap each warm rice ball individually in plastic wrap (excluding the nori) and place in a freezer bag after cooling. Frozen onigiri retains quality for about a month but tastes best within two weeks. Never leave rice balls at room temperature for extended periods.
Reheating tips for best texture
Microwave frozen onigiri with a damp paper towel for 30-40 seconds until heated through. Alternatively, try pan-frying to create yaki onigiri—a crispy exterior with a soft interior. For steaming, place in a steamer basket above boiling water for 5-7 minutes. Always add fresh nori after reheating to maintain its crisp texture.
Conclusion
Chicken onigiri stands out as one of the most versatile and satisfying Japanese foods you can make at home. Throughout this guide, we’ve explored everything from selecting the right rice to creating delicious fillings and mastering different shaping techniques. Additionally, the beauty of these rice balls lies in their adaptability – you can easily customize them based on your preferences and what’s available in your kitchen.
Many people assume Japanese cooking is difficult, but as you can see, onigiri requires just a few simple ingredients and basic techniques. The combination of fluffy rice and savory chicken creates a perfect balance that keeps me coming back for more. Therefore, I encourage you to try making these rice balls yourself – they might become your new favorite portable meal!
Remember that practice makes perfect when shaping onigiri. Initially, you might find the rice sticking to your hands or the balls falling apart, but don’t get discouraged. Eventually, you’ll develop a feel for the right amount of pressure needed to create perfectly shaped rice balls every time.
Last but not least, chicken onigiri offers a wonderful gateway into Japanese cuisine. After mastering this basic recipe, you can certainly explore other traditional Japanese dishes with newfound confidence. So grab some rice and chicken, and start creating these delightful rice balls that have been keeping Japanese families satisfied for generations!
FAQs
Q1. What type of rice is best for making chicken onigiri? Japanese short-grain rice, often labeled as sushi rice, is ideal for making onigiri. It has a high starch content that creates a sticky texture when cooked, allowing the rice balls to hold their shape well.
Q2. How do I shape onigiri if I don’t have a mold? To shape onigiri by hand, wet your palms with salted water to prevent sticking. Take a handful of the rice mixture, gently press it between your palms, and rotate to form a triangle shape. With practice, you’ll develop the right technique for perfectly shaped rice balls.
Q3. Can I make vegetarian onigiri? Absolutely! You can create delicious vegetarian onigiri by substituting chicken with firm tofu or seitan, marinated in similar flavorings. Adding edamame to the rice is another great way to incorporate plant-based protein.
Q4. How long can I store chicken onigiri? For the best flavor and texture, it’s recommended to enjoy onigiri fresh. However, you can freeze them for up to a month, though they taste best within two weeks. Always wrap them individually in plastic wrap before freezing, excluding the nori.
Q5. What are some popular flavoring options for chicken onigiri? Popular chicken onigiri variations include teriyaki chicken, spicy mayo chicken, and soboro (ground chicken). You can also experiment with add-ins like pickled vegetables, furikake seasoning, or a simple combination of soy sauce and mirin for extra flavor.