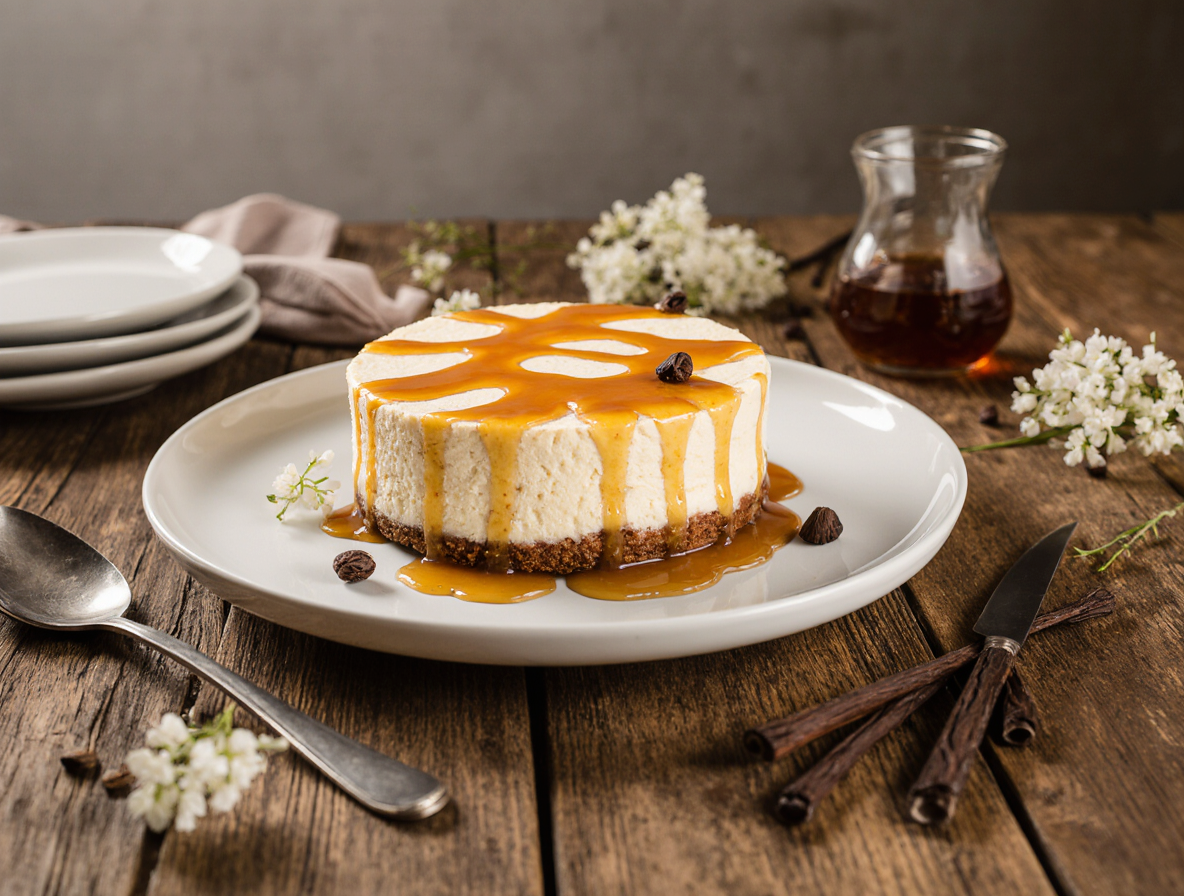
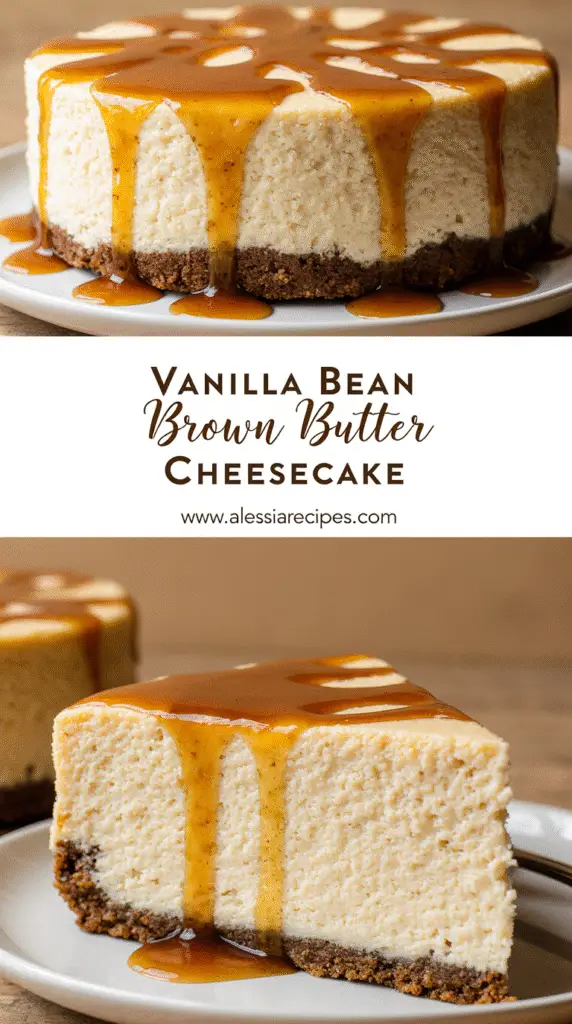
How to Make Brown Butter Cheesecake: A Foolproof Guide for Silky Results
Cheesecakes are deceptively tricky desserts that often turn out less-than-perfect despite how simple they appear . Have you ever spent hours preparing a
cheesecake only to find it cracked, sunken, or lacking that perfect texture?
Fortunately, brown butter cheesecake offers a foolproof path to dessert perfection. This isn’t just any dessert—it’s a celebration of flavor, patience, and comfort .
The combination of deep, nutty brown butter with the pure, floral warmth of vanilla bean creates a cheesecake that’s both indulgent and refined. Each bite delivers
a buttery crunch from the graham cracker-pecan crust, followed by a luxuriously smooth filling that practically melts in your mouth . Despite requiring minimal
ingredients, the vanilla brown butter cheesecake develops fantastic flavor through its carefully balanced components .
In this guide, we’ll walk you through our step-by-step process for creating the perfect brown butter vanilla bean cheesecake. From properly browning butter
without burning it to achieving that super smooth, silky texture, we’ve got you covered. Although you’ll need to prepare it at least one day before serving (and up
to two days ahead) , the result is well worth the wait—a creamy, dreamy slice of pure bliss .
Understanding Brown Butter and Vanilla Bean
The magic of brown butter cheesecake begins with understanding its star ingredients. Let’s demystify these flavor powerhouses that transform an ordinary
cheesecake into something extraordinary.
What is brown butter and why it matters
Brown butter, known in French as beurre noisette (hazelnut butter), is a one-ingredient wonder that vastly improves any dish it graces. When regular butter is
heated beyond melting, it undergoes a magnificent transformation. As moisture evaporates, the milk solids separate, sink to the bottom of the pan, and gradually
toast to a golden hue. This simple process creates a complex flavor profile that’s intensely buttery, nutty, and caramelized.
The magic happens through the Maillard reaction, where amino acids and sugars interact to create new flavor compounds. Those humble brown specks in your
butter contain all the rich flavor—never strain them out! For our cheesecake, brown butter adds depth that perfectly complements the sweet, creamy filling.
How to make brown butter without burning it
Creating perfect brown butter requires attention and patience. Start by cutting butter into even pieces to ensure uniform melting. Use a light-colored,
heavy-bottomed pan that distributes heat evenly and allows you to monitor the color changes.
Melt the butter over medium heat, stirring frequently. You’ll notice it goes through several stages:
1. Melting completely
2. Bubbling and sputtering as water evaporates
3. Foaming while milk solids separate
4. Clearing up so you can see the bottom
5. Finally, browning of milk solids
The entire process takes approximately 5-8 minutes. When the butter turns amber and smells intensely nutty, immediately remove it from heat. Remember, there
are merely seconds between perfectly browned and burnt butter, so never walk away or stop stirring!
Choosing between vanilla bean, paste, or extract
For your brown butter cheesecake, the vanilla component is equally important. Vanilla beans offer the most intense flavor and those beautiful black specks
throughout your dessert. They’re ideal for light, fluffy desserts where visual appeal matters.
Vanilla bean paste provides a convenient middle ground—offering the potent flavor and specks without the hassle of splitting and scraping pods. It’s particularly
excellent in custards and frostings.
Pure vanilla extract works well when vanilla isn’t the star ingredient. Generally, one tablespoon of vanilla paste equals one whole vanilla bean or one tablespoon
of extract, making substitutions straightforward.
Whichever form you choose, avoid artificial options—they simply can’t match the complex flavor profile that complements brown butter so perfectly.
Preparing the Crust and Filling
Now that we understand our star ingredients, let’s assemble the components of our brown butter cheesecake. The right preparation techniques make all the
difference between an ordinary dessert and a showstopper.
Ingredients you’ll need for the crust
Initially, gather your crust ingredients: 1½-2 cups graham cracker crumbs (about 11-12 full sheets), 2 tablespoons granulated sugar, 1-2 tablespoons brown
sugar, and 5-7 tablespoons of your prepared brown butter. For a twist, you can substitute digestive cookies, vanilla wafers, or even Biscoff cookies for the graham
crackers. These alternatives offer unique flavor profiles that complement the nutty brown butter beautifully.
How to make a nutty graham cracker crust
To create that perfect foundation, finely crush your crackers using a food processor or rolling pin. Mix the crumbs with both sugars, then gradually add the melted
brown butter until the mixture resembles wet sand and holds together when pressed. For additional nutty flavor, incorporate ½ cup of finely chopped pecans.
Press this mixture firmly into your springform pan, using a flat-bottomed measuring cup to compact it evenly across the bottom and about 1-2 inches up the sides.
Pre-bake at 350°F for 8-10 minutes until just set and fragrant. This brief baking helps the crust hold together when sliced.
Mixing the filling for a smooth texture
For the filling, you’ll need 32 ounces (four 8-ounce packages) of full-fat cream cheese, 1½ cups light brown sugar, ¾ cup cooled brown butter, 3 large eggs, and 1
teaspoon vanilla.
Furthermore, blend the cream cheese and sugar first until completely smooth. Subsequently, add the brown butter, then eggs one at a time, mixing minimally
after each addition. Overmixing once eggs are added can cause cracks later.
Tips for using room temperature ingredients
Notably, room temperature ingredients are non-negotiable for a silky-smooth cheesecake. Cold cream cheese will create lumps that never fully incorporate. If
you’ve forgotten to plan ahead, microwave unwrapped cream cheese in 10-second bursts, place eggs in warm water for 10 minutes, and warm sour cream in
5-second microwave intervals.
Baking and Cooling the Cheesecake
The baking process can make or break your brown butter cheesecake, regardless of how perfectly you’ve prepared your ingredients. This critical stage requires
careful attention to detail and patience.
Why a water bath is essential
A water bath creates a humid environment that transforms your brown butter cheesecake from good to exceptional. This method involves placing your springform
pan inside a larger pan filled with hot water. Essentially, the water bath acts like a spa treatment for your cheesecake, providing gentle, even heat throughout the
baking process. Moreover, the steam prevents the surface from drying out, reducing the risk of cracks while ensuring a creamy, smooth texture [1]. For brown
butter vanilla bean cheesecake, this moist environment is particularly important as it helps preserve the delicate flavors.
How to avoid cracks and overbaking
The primary culprit behind cracked cheesecakes is overbaking [2]. Unlike traditional cakes, cheesecakes should still have a slight jiggle in the center when done.
To test doneness, gently tap the side of your pan with a wooden spoon—the center should wobble like jello, not ripple like milk [3].
During baking, avoid opening the oven door as drafts and temperature changes often cause cracks [2]. Another helpful technique is to wrap your springform pan in
aluminum foil before placing it in the water bath, creating a barrier between your brown butter cheesecake and the water [4].
Cooling and chilling for best results
After baking, cooling gradually is crucial. Turn off the oven, crack the door open, and leave your vanilla brown butter cheesecake inside for about an hour [4]. This
slow cooling prevents the shock of temperature change that can cause cracks and sinking [2].
Once the cheesecake has cooled in the oven, run a sharp knife around the edge to release it from the sides of the pan [3]. This prevents cracks from forming as
the cheesecake contracts while cooling. Afterward, let it cool completely at room temperature before refrigerating overnight—this patience ensures that silky,
perfect texture [5].
Finishing Touches and Serving Tips
After your brown butter cheesecake has properly chilled, it’s time to add those finishing touches that elevate it from excellent to extraordinary.
Making whipped cream or praline topping
For a brown butter vanilla bean whipped cream, combine heavy cream, granulated sugar, and vanilla bean paste in a mixing bowl. Whip until stiff peaks form. For
an elevated version, incorporate 2 tablespoons of cooled browned butter into your whipped cream mixture. Additionally, consider a praline topping by combining
brown sugar, heavy cream, butter, and chopped pecans in a saucepan. Cook until thickened, then cool slightly before spreading over your cheesecake.
How to slice and serve cleanly
For picture-perfect slices, chill your brown butter cheesecake completely. Remove it from the springform pan and place on a serving platter. Henceforth, use one
of these methods:
1. Hot knife method: Dip a sharp knife in hot water, wipe dry, then slice from the edge toward the center in one clean motion. Clean and reheat the knife between
each cut.
2. Wire method: Use unflavored dental floss or fishing line wrapped around your thumbs, pulling down through the cheesecake.
Storage and make-ahead instructions
This vanilla bean brown butter cheesecake keeps well for 4-5 days when properly stored. Cover with plastic wrap or place in a cake carrier. Furthermore, you can
make this dessert up to two days ahead, storing it in the refrigerator until serving time.
Can you freeze brown butter cheesecake?
Absolutely! Freeze your brown butter cheesecake for up to 3 months. Wrap the cooled cheesecake in plastic wrap followed by aluminum foil. Ideally, freeze
without toppings and add fresh garnishes after thawing. Thaw overnight in the refrigerator before serving for best texture.
Conclusion
Brown butter cheesecake stands as a testament to how patience and attention to detail can transform a classic dessert into something extraordinary. Throughout
this guide, we’ve explored the nutty depth that properly browned butter brings to your cheesecake, along with the aromatic warmth of real vanilla. Together, these
ingredients create a dessert experience that’s both sophisticated and comforting.
Although making this cheesecake requires some planning and time, the results certainly justify every minute spent. The techniques we’ve shared—from properly
browning butter without burning it to the essential water bath method—ensure your cheesecake will have that coveted silky texture and crack-free surface every
time.
Most importantly, this dessert offers remarkable versatility. You can prepare it up to two days ahead for special occasions or freeze it for future enjoyment.
Additionally, you can customize it with different crusts and toppings to suit your preferences or the season.
Remember that success comes from respecting the process. Room temperature ingredients, gentle mixing after adding eggs, proper baking temperature, and
patience during cooling all contribute to the perfect result. Therefore, take your time with each step.
The next time you crave an impressive dessert that balances elegance with homey comfort, this brown butter cheesecake awaits. Your friends and family will
undoubtedly appreciate both the rich flavor and the care you’ve invested in creating this silky, decadent treat. After all, few desserts manage to be simultaneously
simple yet sophisticated, familiar yet unique—a balance this cheesecake achieves beautifully.
FAQs
Q1. What makes brown butter special in cheesecake? Brown butter adds a rich, nutty, and caramel-like flavor to the cheesecake. It’s created by heating
regular butter until the milk solids brown, resulting in a more complex taste that enhances the overall dessert experience.
Q2. How can I prevent my cheesecake from cracking? To prevent cracks, use a water bath while baking, avoid opening the oven door, and don’t overbake.
The cheesecake is done when the center still has a slight jiggle. After baking, cool it gradually in the oven with the door cracked open.
Q3. Can I make this cheesecake ahead of time? Yes, you can make this cheesecake up to two days in advance. Store it properly in the refrigerator until
serving time. You can also freeze it for up to 3 months if wrapped well in plastic wrap and aluminum foil.
Q4. What’s the best way to achieve a smooth cheesecake texture? For a silky-smooth texture, use room temperature ingredients, especially the cream
cheese. Mix the filling carefully, avoiding overmixing once the eggs are added. Bake in a water bath and cool the cheesecake slowly to maintain its creamy
consistency.
Q5. How do I get clean slices when serving the cheesecake? For clean slices, ensure the cheesecake is well-chilled. Use a sharp knife dipped in hot water
and wiped dry between each cut. Alternatively, you can use unflavored dental floss or fishing line to cut through the cheesecake for perfectly neat slices.