Easy Cannoli Cake Recipe: The Secret to Perfect Italian Dessert
Craving the rich flavors of cannoli but want an easy cannoli cake recipe instead? This heavenly creation marries the classic Italian cannoli taste with the elegance of a layered cake, delivering an indulgent experience with every slice. With just 6 basic ingredients, you can enjoy all the delicious flavor of your favorite chocolate chip cannoli, but with a fraction of the work!
In this guide, I’ll walk you through creating the perfect Italian cannoli cake complete with tender vanilla cake layers and a creamy, sweet chocolate chip ricotta filling. The combination of moist sponge, velvety frosting, and chocolate chips creates an irresistible blend of textures that tastes even better the next day as the flavors meld together. Whether you’re preparing for a family gathering or special occasion, this 9×13 format makes it ideal for serving 12-15 people with generous portions.
What makes this cannoli cake absolutely amazing is the frosting that tastes just like homemade cannoli filling. I’ll show you how to achieve that perfect balance of sweetness and richness that will have everyone asking for your recipe.
Choosing the Right Cannoli Cake Style
The world of cannoli cakes offers three delightful variations, each with unique characteristics that make them special for different occasions and skill levels.
Classic layered cake vs. poke cake vs. no-bake
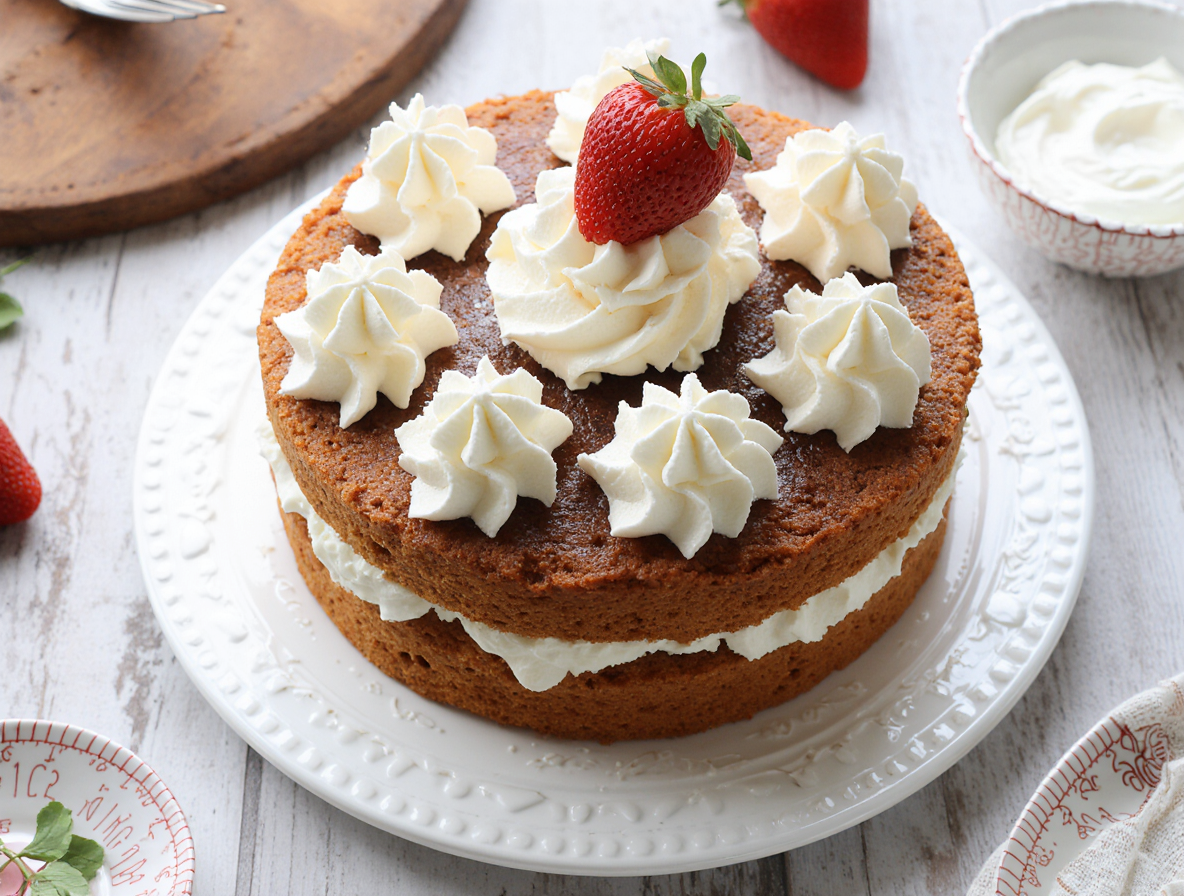
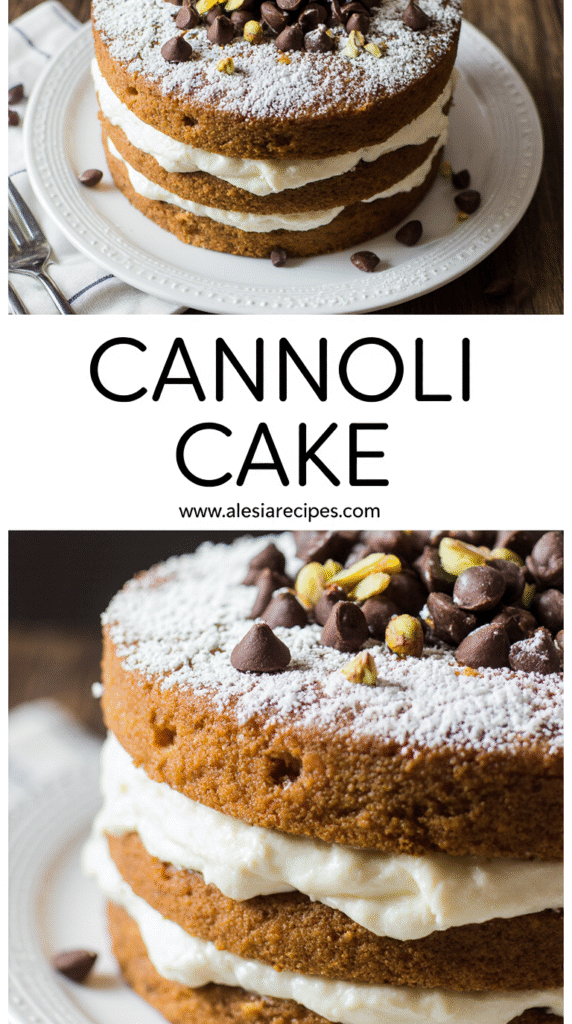
The classic layered cannoli cake features multiple moist yellow cake layers separated by sweet ricotta cheese filling. This elegant version is typically frosted with mascarpone buttercream and chocolate ganache, creating a showstopping dessert that can be crowned with mini cannoli shells for decoration. The finished cake is rich yet deceptively light, with the ricotta filling speckled with mini chocolate chips making the inspiration unmistakable.
Poke cakes offer a different approach to the cannoli experience. This style involves baking a sheet cake, then poking holes throughout and filling them with a special cannoli mixture. While some versions use sweetened condensed milk as the soaking liquid, others use a pudding mix combined with cannoli filling ingredients like mascarpone cheese, ricotta cheese, orange, cinnamon, and chocolate chips. The technique for creating good holes matters—using the bottom of a wooden spoon and giving it a little twist before removing helps prevent excess crumbs.
For those seeking convenience, a no-bake cannoli cake provides a quick solution that doesn’t require turning on the oven. This showstopping version is perfect when you need something quick and delicious, particularly during warm weather or when entertaining guests. It delivers all the flavor with significantly less effort.
When to choose each version
Select the classic layered cake for special occasions like birthdays, anniversaries, or as a delicious finale to an Italian meal. Though not difficult to assemble, it does involve multiple steps, making it ideal when you want to impress guests with your baking skills.
Opt for a poke cake when you need a make-ahead dessert for parties or potlucks. This version actually improves with time—although you can serve it a few hours after making, it’s much better the next day when the cake becomes properly soaked with the filling. It’s also perfect for feeding a crowd in a 9×13 format.
Choose the no-bake version when you’re short on time, during hot summer months when you don’t want to heat up the kitchen, or when you need a guaranteed crowd-pleaser without extensive preparation. Furthermore, this style works wonderfully for those who prefer desserts that aren’t overly sweet, as it offers the perfect balance of flavors without excessive sweetness.
Each style delivers the beloved cannoli flavors in a unique format, allowing you to choose based on your occasion, time constraints, and baking comfort level.
Essential Cannoli Cake Ingredients
Creating the perfect Italian cannoli cake starts with gathering high-quality ingredients that capture the essence of this beloved dessert. The magic happens when simple components come together to create something extraordinary.
Cake base: flour, eggs, butter, and buttermilk
The foundation of any great cannoli cake begins with all-purpose flour (typically 2-2½ cups), which provides structure to your cake layers. For the lightest texture, room temperature eggs (usually 2-3) are essential since they incorporate more air into the batter. Unsalted butter (⅔-¾ cup) adds richness, whereas buttermilk (1-1¼ cups) contributes tenderness and a subtle tanginess that balances the sweetness. Some recipes substitute vegetable oil for butter since it keeps the cake moist even after refrigeration.
Cannoli cake filling: ricotta, mascarpone, and sugar
The heart of an authentic cannoli cake lies in its creamy filling. Whole milk ricotta (15-16 ounces) provides that classic cannoli flavor, moreover, draining it overnight on paper towels removes excess moisture for the perfect consistency. Mascarpone cheese (8-16 ounces) adds luxurious creaminess without being overly tangy. Powdered sugar (1-2 cups) sweetens the mixture while dissolving seamlessly to ensure a silky-smooth texture.
Flavor boosters: cinnamon, orange zest, vanilla
What truly elevates a cannoli cake beyond ordinary desserts are its distinctive flavor enhancers. A hint of cinnamon (typically ½-1 teaspoon) adds warmth, specifically complementing the cheese mixture. Fresh orange zest brightens the entire profile with its aromatic oils, subsequently creating that authentic Sicilian taste. Pure vanilla extract enhances everything, binding the flavors together harmoniously.
Toppings: mini chocolate chips, crushed shells
The finishing touches make a cannoli cake instantly recognizable. Mini chocolate chips (¾-1 cup) provide little bursts of flavor throughout the filling and make an attractive decoration. In essence, crushed cannoli shells or sugar cones create a delightful textural contrast, occasionally complemented by chopped pistachios for an extra layer of nutty flavor and visual appeal.
How to Make a Cannoli Cake Step-by-Step
Let’s transform those cannoli flavors into a gorgeous layered cake! This step-by-step guide breaks down the process into manageable stages, making this Italian dessert accessible for home bakers of all skill levels.
1. Prepare the cake layers
Begin by preheating your oven to 350°F and preparing two 9-inch round cake pans with parchment paper circles, greasing and flouring the sides. In a medium bowl, whisk together 2 cups of all-purpose flour, 2 teaspoons of baking powder, and ¼ teaspoon of salt. In a separate bowl, beat 1 cup of butter until creamy, gradually add 1½ cups of sugar, and mix until combined. Add 4 large eggs one at a time, beating well after each addition. Alternate adding the dry ingredients mixture with ½ cup of milk and 2 teaspoons of vanilla, starting and ending with the dry ingredients. Pour the batter evenly into the prepared pans and bake for approximately 25 minutes until a toothpick inserted comes out clean. Allow cakes to cool for 10 minutes in the pans before transferring to a wire rack.
2. Make the cannoli filling
While the cakes cool, prepare your filling. Whisk together 16 ounces of ricotta and 8 ounces of mascarpone cheese until well combined. Add ½ cup of confectioners’ sugar, 1 teaspoon of vanilla extract, and orange zest from one orange, then whisk until the mixture is slightly whipped. Gently fold in 1 cup of mini chocolate chips, cover, and refrigerate until ready to assemble.
3. Assemble and frost the cake
Place one cake layer on a serving plate. Spread about 1 cup of filling over the first layer. Top with the second cake layer and spread the remaining filling over the top of the cake, extending to within 1 inch of the edge. For a more polished look, some recipes include a separate frosting for the sides.
4. Add toppings and chill
Press almonds into the sides of the cake if desired, and sprinkle mini chocolate chips on top. For authentic flair, consider adding crushed cannoli shells as decoration. Refrigerate the cake for at least 30 minutes before serving. For the best flavor and texture, let the chilled cake sit at room temperature for 30 minutes before slicing.
Tips to Perfect Your Italian Cannoli Cake
The difference between a good cannoli cake and an extraordinary one often comes down to mastering a few key techniques. These essential tips will elevate your Italian cannoli cake from merely tasty to absolutely unforgettable.
Drain ricotta properly
First of all, properly draining your ricotta is non-negotiable for a stable, delicious filling. Undrained ricotta creates a runny filling that can ruin your cake’s structure and texture. Place ricotta in a cheesecloth-lined strainer over a bowl, then add weight on top (like butter packages or soda cans) to extract excess moisture. For best results, drain overnight in the refrigerator—this can yield several tablespoons of liquid. Alternatively, press the cheese between paper towels, changing them several times until moisture is removed.
Use room temperature ingredients
Room temperature ingredients are crucial for achieving that perfect cake texture. Cold eggs can cause butter to seize, resulting in a broken or curdled-looking batter. To quickly bring eggs to room temperature, place them in warm water for 10 minutes. Room temperature ingredients incorporate more easily, preventing overmixing and creating a lighter, fluffier cake. This simple step makes a remarkable difference in your final product.
Avoid overmixing the batter
Overmixing develops gluten, leading to dense, tough cakes rather than light, tender ones. Once you add flour, mix on low speed until ingredients are just combined, stopping when a few streaks remain. Consider using a folding technique with a spatula for the final mix. Additionally, a larger mixing bowl gives you space to make broad, gentle strokes that minimize friction—the real culprit behind tough batter.
Let the cake cool before frosting
Patience truly pays off when it comes to cooling. Allow cake layers to cool completely before adding cannoli filling or frosting. Applying frosting to warm cake results in a melted, sliding mess. For layer cakes, cooling helps prevent filling from becoming runny between layers.
Chill before serving for best texture
Essentially, chilling completes the transformation. Refrigerate your assembled cannoli cake for at least 1-2 hours (preferably overnight) before serving. This setting time allows flavors to meld and textures to stabilize. Consequently, the cake becomes easier to slice cleanly. For optimal flavor, remove from refrigeration about 15-30 minutes before serving—cannoli cake tastes best slightly cooled rather than cold from the refrigerator.
Conclusion
After all the steps and tips we’ve covered, you’re now ready to create an exceptional Italian cannoli cake that will impress family and friends alike. This dessert truly offers the best of both worlds – the traditional cannoli flavors we love combined with the elegant presentation of a layered cake.
The beauty of this recipe lies in its versatility. Whether you choose the classic layered version for special occasions, the convenient poke cake for make-ahead gatherings, or the quick no-bake option for summer parties, each style delivers that authentic cannoli experience with its own unique twist.
Additionally, paying attention to those key techniques makes all the difference. Properly draining the ricotta ensures a stable filling, while using room temperature ingredients creates that perfect cake texture. Similarly, careful assembly and appropriate chilling time allow the flavors to meld together beautifully.
What makes this cake particularly special is how it transforms simple ingredients into something extraordinary. The rich ricotta filling, subtle cinnamon warmth, bright orange notes, and chocolate chip surprises create a dessert that feels both familiar and special at once.
The next time you crave the classic Italian cannoli taste but want something more substantial to serve a crowd, this recipe certainly delivers. Your guests will undoubtedly ask for seconds – and for your recipe! This cannoli cake might just become your new signature dessert, perfect for any occasion that calls for something a little extra special.
FAQs
Q1. What are the key ingredients for a cannoli cake? The essential ingredients include flour, eggs, butter, and buttermilk for the cake base; ricotta, mascarpone, and sugar for the filling; cinnamon, orange zest, and vanilla for flavor; and mini chocolate chips and crushed cannoli shells for toppings.
Q2. How long should I chill the cannoli cake before serving? It’s best to refrigerate the assembled cannoli cake for at least 1-2 hours, preferably overnight. This allows the flavors to meld and the textures to stabilize. For optimal taste, remove it from the refrigerator about 15-30 minutes before serving.
Q3. Can I make a no-bake version of cannoli cake? Yes, a no-bake cannoli cake is a great option when you’re short on time or don’t want to use the oven. It’s perfect for hot summer days and still delivers the authentic cannoli flavors in a convenient format.
Q4. Why is it important to drain the ricotta cheese? Draining the ricotta is crucial for achieving a stable, delicious filling. Undrained ricotta can create a runny filling that affects the cake’s structure and texture. Properly drained ricotta ensures a perfect consistency for your cannoli cake.
Q5. How can I prevent my cannoli cake from becoming dense? To avoid a dense cake, use room temperature ingredients, especially eggs and butter. Also, be careful not to overmix the batter once you add the flour. Mix on low speed just until the ingredients are combined, stopping when a few streaks remain. This helps create a lighter, fluffier cake texture.