How to Make Perfect Cherry Cheesecake Bites (No Oven Needed!)
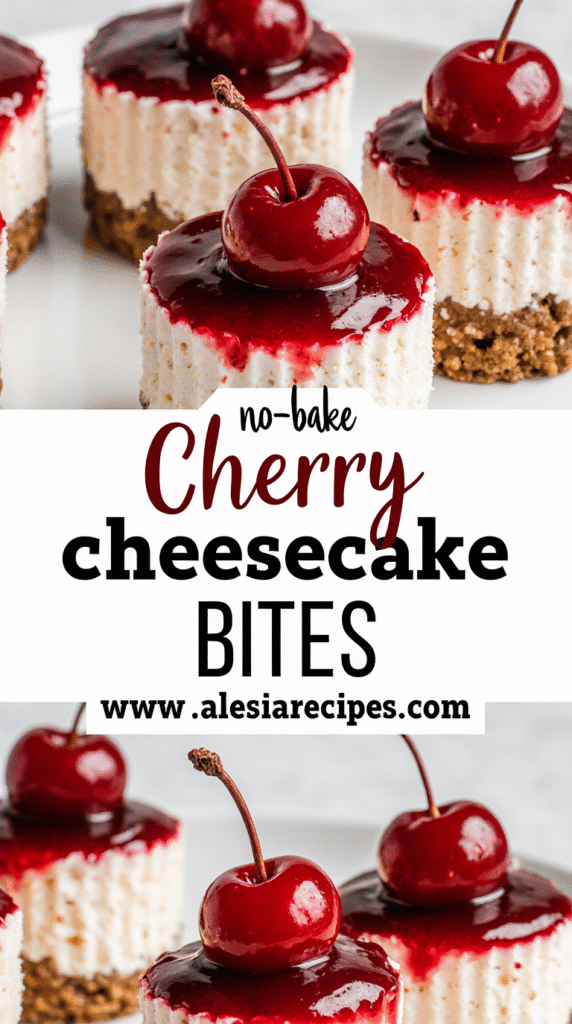
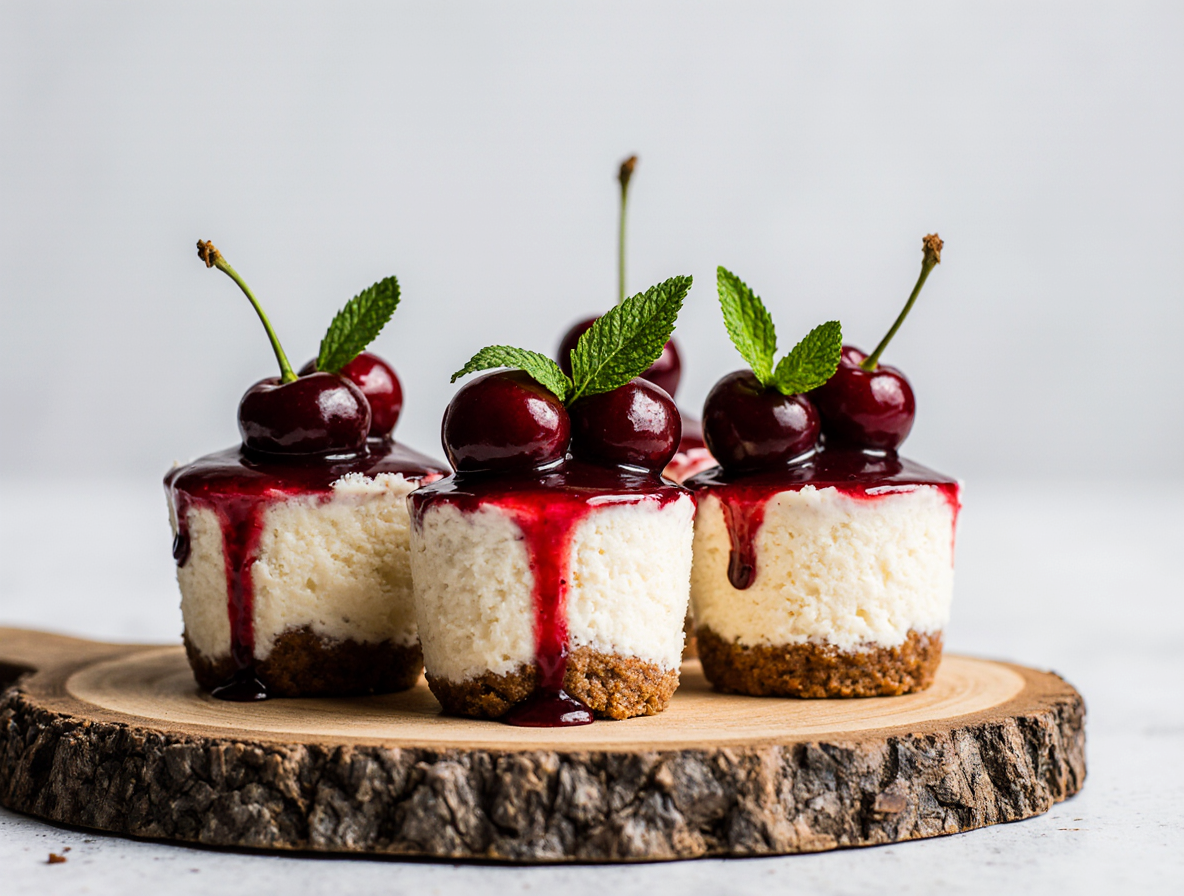
Cherry cheesecake bites are one of my favorite desserts to whip up when I need something delicious without turning on the oven. These delightful mini treats combine a buttery graham cracker crust with creamy cheesecake filling, all topped with sweet cherry pie filling — and they only take about 20 minutes to prepare.
What makes no bake cherry cheesecake bites so appealing is their versatility and convenience. They’re perfect for parties and family gatherings, and you can make about 4 dozen of these mini delights in one batch. Furthermore, these quick cherry cheesecake bites store beautifully in the refrigerator for up to 3 days or even in the freezer for up to 3 months if you want to prepare them ahead of time.
In this guide, I’ll walk you through my step-by-step process for creating these irresistible treats. From selecting the perfect crust ingredients to achieving that smooth, creamy filling and adding the perfect cherry topping — all without ever needing to preheat your oven. Whether you’re a seasoned baker or just starting out, these bite-sized cheesecakes are surprisingly simple to master.
Choosing the Right Base for Your Cheesecake Bites
The foundation of great cherry cheesecake bites begins with selecting the perfect crust. A well-made base provides structure and complementary flavor that elevates these tiny treats from good to unforgettable.
Graham cracker crust vs. cookie crust
Graham cracker crusts remain the classic choice for cheesecake bites, offering that distinctive honey-sweet flavor that pairs beautifully with creamy fillings. For the best results, I recommend using Nabisco Honey Maid graham crackers, which provide consistent texture and flavor.
However, don’t feel limited to traditional graham crackers. Cookie crusts open up exciting flavor possibilities for your no-bake cherry cheesecake bites:
- Vanilla wafers create a sweeter, more delicate base
- Shortbread cookies offer buttery richness
- Chocolate cookies provide striking contrast with cherry topping
- Gingersnaps add warm spice notes
- Oreos create an indulgent chocolate foundation
Each option creates a distinct flavor profile. Additionally, digestive biscuits make an excellent substitute if graham crackers aren’t available, as they weigh approximately the same (15g per biscuit).
How to make a no-bake crust stick together
The perfect crust has a sandy texture that holds together firmly without becoming hard or greasy. The secret lies in three key ingredients: crumbs, sweetener, and butter.
For standard cherry cheesecake bites, you’ll need approximately 1½ cups of finely crushed crumbs (about 9-10 graham cracker sheets). Crushing them to a fine, even consistency is crucial—think sand-like texture. A food processor works best, though a ziplock bag and rolling pin accomplish the same result.
Brown sugar makes a significant difference in no-bake crusts. It adds subtle caramel notes and helps bind the mixture better than granulated sugar. Mix the sugar with crumbs first before adding melted butter gradually to prevent clumping.
The most common mistake? Using incorrect butter proportions. Too little butter creates a crumbly mess that falls apart; too much produces a greasy base. For a properly textured crust, the mixture should resemble wet sand and hold together when pressed.
Mini muffin tin vs. bar pan options
Your choice of pan dramatically affects both presentation and ease of serving these bite-sized treats.
Mini muffin tins create perfectly portioned, individual cherry cheesecake bites. I strongly recommend using mini cupcake liners for easy removal. Standard mini muffin cups measure about 1⅞ inches in diameter, yielding approximately 24 bites per batch.
Conversely, bar pans offer convenience when feeding crowds. An 8×8-inch pan works perfectly for the standard recipe, while a 9×13-inch pan requires 1.5x the ingredients. Always line bar pans with parchment paper, leaving overhang on the sides for easy removal.
Regardless of which pan you choose, the pressing technique remains crucial. Use a measuring cup or glass with firm pressure to create compact, even crusts—especially at the edges where crusts often become too thin.
Making the Creamy No-Bake Cheesecake Filling
The heart of any cherry cheesecake bite lies in its velvety filling. Creating the perfect no-bake cheesecake filling requires attention to detail, but the process is surprisingly straightforward once you understand the science behind it.
Using cream cheese and whipped cream
For the creamiest cherry cheesecake bites, Philadelphia brick-style cream cheese delivers consistent results. This foundation ingredient must be at room temperature—never cold—to prevent those frustrating lumps that can ruin your filling.
The magic happens when you combine cream cheese with whipped cream. This combination creates a light, mousse-like texture that firms up beautifully without baking. For the perfect ratio, most recipes call for three 8-ounce bricks of cream cheese paired with heavy cream.
First, beat the cream cheese until fluffy, then separately whip cold heavy cream until stiff peaks form. Folding them together gently is crucial—you’re preserving the air bubbles that give your no-bake cherry cheesecake bites their distinctive texture.
Sweeteners: powdered sugar vs. condensed milk
When sweetening your cherry cheesecake bites, you have two excellent options. Powdered sugar not only sweetens but also helps stabilize the filling thanks to its cornstarch content. A combination of granulated and powdered sugar creates ideal sweetness without overwhelming the tangy cream cheese.
Alternatively, sweetened condensed milk produces a silkier, creamier texture with caramel undertones. It contains approximately 40% sugar, providing substantial sweetness while contributing to the filling’s structure.
Flavoring with vanilla or lemon juice
Vanilla extract is essential—use real extract rather than imitation for pure, unaltered flavor. Most recipes call for 1 teaspoon, although some suggest up to 3 tablespoons for stronger flavor.
A small amount of lemon juice (1-2 tablespoons) adds brightness that balances the richness of the filling. This subtle tang is the secret to authentic cheesecake flavor—pairing beautifully with the sweetness of cherry topping.
Tips for a smooth, lump-free texture
Ultimately, achieving that perfectly smooth texture comes down to three critical factors:
- Temperature matters: Cream cheese must be truly room temperature—leave it out for at least one hour before mixing.
- Proper mixing order: Beat cream cheese with sugar until smooth before adding other ingredients.
- Chilling time: Allow at least 4 hours in the refrigerator, though overnight produces the best results.
For cherry cheesecake bites that hold their shape perfectly, refrigerate the prepared filling for a minimum of 12 hours before serving. This patience pays off with beautifully sliceable, professional-looking treats.
Topping and Assembling Your Cherry Cheesecake Bites
Topping your cherry cheesecake bites is where creativity meets presentation. Once the crust and filling are prepared, it’s time for the finishing touch that transforms these treats into eye-catching desserts.
How to add cherry pie filling without mess
The key to perfectly topped cherry cheesecake bites starts with proper timing. Always chill your cheesecake first, ensuring the filling is firm enough to support the weight of the cherries.
During application, resist the urge to dump the entire can of filling on top. Instead, I’ve found that using a spoon to gently place cherries in the center of each bite and then spreading outward gives much better control. This center-to-outward technique prevents overflow and maintains those picture-perfect edges.
For individual bites, aim for approximately one cherry per mini cheesecake. This provides the perfect cherry-to-cheesecake ratio without overwhelming the delicate balance of flavors.
Other topping ideas: chocolate, berries, nuts
Cherry topping remains classic, yet these versatile treats welcome countless creative variations:
- Fruit alternatives: Blueberry, strawberry, raspberry, or mixed berry pie fillings work beautifully as substitutes
- Chocolate options: Drizzle with chocolate ganache, syrup, or even sprinkle with Oreo cookie crumbs
- Sweet sauces: Caramel, dulce de leche, or butterscotch create indulgent alternatives
- Fresh approach: Arrange fresh berries, mandarin orange slices, or kiwi atop a dollop of whipped cream
- Candy creations: Reese’s peanut butter cups or crushed candy canes during holidays add playful elements
For added flavor dimension, consider incorporating coconut flakes into your cherry mixture.
Layering tips for clean presentation
For professionally layered cherry cheesecake bites, preparation makes all the difference. Using piping bags helps maintain even layers and prevents messy edges. A simple alternative is a quart-sized ziplock bag with the corner cut off.
When piping, start from the center and work outward, smoothing the top with a small spoon between layers. This creates that professional, bakery-quality appearance.
For parfait-style presentations, alternate layers of graham cracker crumbs, cheesecake filling, and cherry topping. Clear serving cups showcase these beautiful layers, making them particularly impressive for gatherings.
Add final garnishes just before serving. A dollop of fresh whipped cream, a sprinkle of graham cracker crumbs, or even an edible flower creates that perfect finishing touch.
Chilling, Serving, and Storing Your Bites
Patience becomes the secret ingredient after assembling your no bake cherry cheesecake bites. The final steps of chilling and storing determine whether your creations will have that perfect texture and flavor that keeps everyone coming back for more.
How long to chill for best texture
The minimum chilling time for these delightful treats varies across recipes, nonetheless there’s a clear consensus on what works best. For quick setting, refrigerate your cherry cheesecake bites for at least 3-4 hours. Meanwhile, some recipes suggest a minimum of 1 hour in the refrigerator, primarily for smaller bites that firm up faster.
For truly exceptional texture, I’ve found that overnight chilling produces the best results. This extended time allows the flavors to meld together beautifully coupled with achieving that perfect firmness. In a rush? You can speed up the process by placing the bites in the freezer, yet be careful not to freeze them completely as this affects the texture.
Serving tips for parties and holidays
These cherry cheesecake bites truly shine at gatherings since they’re wonderfully portable and remain firm even at room temperature. For parties, consider creating a beautiful display on a cake stand or platter.
If serving at an event where they’ll sit out, try this professional trick: place the serving dish on a bed of ice to keep your cherry cheesecake bites perfectly chilled for up to 2 hours. Furthermore, always add the cherry topping just before serving to maintain the clean presentation.
After all, timing matters—these treats begin to soften after about 30-60 minutes at room temperature. For best flavor, let them sit for 15-20 minutes before serving from the refrigerator.
How to store in fridge or freezer
In the refrigerator, cherry cheesecake bites will keep fresh for up to 5 days when stored in an airtight container. A clever storage tip: place paper towels underneath the bites to absorb moisture and prevent soggy crusts.
For longer storage, freezing works remarkably well. Wrap the completely chilled bites first in plastic wrap followed by a layer of aluminum foil. These can be frozen for up to 3 months without sacrificing quality. When ready to enjoy, thaw overnight in the refrigerator or let them sit at room temperature for about 15-20 minutes if serving from frozen.
Essentially, these versatile treats can be made well in advance of your event, taking the stress out of last-minute dessert preparation.
Conclusion
These no-bake cherry cheesecake bites truly represent the perfect balance between convenience and indulgence. After making them countless times, I’ve found they become a go-to dessert for everything from casual family gatherings to elegant holiday celebrations. Certainly, their greatest appeal lies in the simplicity – just 20 minutes of preparation time delivers professional-looking treats without ever turning on your oven.
Graham crackers provide the classic foundation, though experimenting with different cookie bases can dramatically transform the flavor profile. Additionally, the filling achieves that perfect creamy texture when you properly combine room-temperature cream cheese with freshly whipped cream. The cherry topping adds that final burst of color and flavor, though countless alternatives await your creative touch.
Patience remains your secret weapon with these delightful treats. Proper chilling ensures they set perfectly, while their make-ahead potential removes last-minute dessert stress. Best of all, you can prepare them days before your event or freeze them for up to three months without sacrificing quality.
Whether you’re an experienced baker or someone looking for a foolproof dessert recipe, these cherry cheesecake bites deliver consistent results every time. The combination of buttery crust, velvety filling, and sweet cherry topping creates an irresistible bite-sized indulgence that your friends and family will request again and again. So grab your mini muffin tin and cream cheese – these delightful treats might just become your signature dessert!
FAQs
Q1. How long do no-bake cherry cheesecake bites need to chill? For the best texture, chill the cheesecake bites for at least 3-4 hours in the refrigerator. However, overnight chilling produces optimal results, allowing flavors to meld and achieve perfect firmness.
Q2. Can I use different toppings instead of cherry? Absolutely! While cherry is classic, you can experiment with various toppings such as blueberry, strawberry, or mixed berry pie fillings. You can also try chocolate ganache, caramel sauce, or fresh fruits for different flavor combinations.
Q3. How do I prevent lumps in the cheesecake filling? To achieve a smooth, lump-free texture, ensure your cream cheese is at room temperature before mixing. Beat the cream cheese with sugar until smooth before adding other ingredients, and follow the proper mixing order in your recipe.
Q4. Can I freeze cherry cheesecake bites? Yes, you can freeze these treats for up to 3 months. Wrap the completely chilled bites in plastic wrap, followed by a layer of aluminum foil. Thaw overnight in the refrigerator before serving.
Q5. What’s the best way to serve cherry cheesecake bites at a party? For parties, create an attractive display on a cake stand or platter. If they’ll be out for a while, place the serving dish on a bed of ice to keep them chilled for up to 2 hours. Add the cherry topping just before serving for the best presentation.