The Perfect Breakfast Fruit Tart with Granola Crust (Ready in 20 Minutes)

Looking for a granola crust recipe that’s both simple to make and visually stunning? I’ve found that breakfast fruit tarts with granola crust are the perfect solution for impressing guests without hours of kitchen work. These beautiful tarts combine rolled oats, nuts, honey, and coconut oil to create a delicate shell that cradles creamy yogurt and fresh seasonal fruit.
What I love about this fruit tart with granola crust is that it’s incredibly forgiving. Even when I began working on this recipe last year and initially faced some “fails,” nothing went to waste—the extra granola was delicious eaten by the handful. After perfecting the technique, these tarts have become a show-stopping centerpiece for our spring and summer brunch gatherings. Additionally, you can prepare the granola pie crust no bake style or baked, depending on your preference and time constraints.
Throughout this article, I’ll share how to make a granola crust that holds together perfectly, filling options that complement the nutty base, and presentation tips to make your breakfast tart as beautiful as it is delicious. Whether you’re making individual tarts or one large 10-inch version, this recipe will certainly become an instant favorite.
Choosing the Right Ingredients for a Granola Crust
Creating the perfect granola crust starts with selecting quality ingredients that work together to form a sturdy, flavorful base for your fruit tart. The right combination makes all the difference between a crust that holds together beautifully and one that crumbles at first touch.
Best oats to use for structure
First and foremost, choose old-fashioned rolled oats for your granola crust. These whole-grain oats maintain their shape during baking and provide the necessary structure. Avoid quick-cooking or instant oats at all costs—they’ve been milled down and are either coarsely chopped or powdery, which will result in a mushy crust that falls apart. Some bakers even prefer extra thick rolled oats for added texture and heartiness.
Nut and seed combinations for binding
The secret to a granola crust that doesn’t crumble lies in the proper ratio of finely ground or chopped nuts and seeds. These ingredients act as natural binders that hold everything together. A mixture of nuts like walnuts, almonds, pecans, or cashews works wonderfully. Furthermore, adding seeds such as pumpkin, sunflower, flax, or sesame not only improves binding but also boosts nutritional value with healthy fats, fiber, and omega-3s.
Moreover, the fineness of your chopped nuts matters significantly—if they’re not chopped finely enough, your tart shells will likely fall apart.
Sweeteners: honey, maple syrup, or agave
For sweetening your granola crust, honey and maple syrup stand out as top choices. Their liquid state coats each oat thoroughly, creating better binding. The ideal ratio is approximately half sweetener and half oil. While agave syrup is sometimes suggested, it contains more fructose than table sugar or even high fructose corn syrup, making it a less healthy option despite its low glycemic index.
Notably, natural sweeteners like honey and maple syrup contribute complex flavors beyond just sweetness, enhancing your tart’s overall taste profile.
Coconut oil vs butter: which works better
In the debate between coconut oil and butter, both perform admirably in granola crusts. Coconut oil creates a perfectly crisp texture and helps the granola bake to a beautiful golden brown. However, butter adds a rich flavor that some prefer.
For those monitoring saturated fat intake, olive oil presents a viable alternative that shifts the flavor slightly toward the savory side. Regardless of your choice, the fat component is essential—it’s what gives your granola crust that irresistible crunch and helps bind all ingredients together.
How to Make and Shape the Granola Crust
Now that you’ve gathered your ingredients, let’s transform them into a beautiful tart shell that’s both sturdy and delicious. The technique matters just as much as your ingredient selection for creating the perfect granola crust.
Mixing and pressing into tart pans
Begin by combining your dry ingredients (oats, nuts, seeds) in a bowl before adding your wet ingredients. Once your sweetener and oil are added, stir until everything is thoroughly coated. For even better binding, some bakers pulse part of the mixture in a food processor to create finer particles that help hold everything together.
For pressing, use about 3-4 tablespoons of mixture per mini tart pan, or enough to cover the bottom and sides completely. The back of a measuring cup works wonderfully for creating an even layer and pressing firmly into the corners. Alternatively, use the bottom of a glass or your fingers with a bit of oil to prevent sticking.
Baking tips for a crunchy shell
Bake your granola crust at a lower temperature—between 300°F and 350°F—for perfect results. This slower baking allows for even browning without burning the nuts or edges. Depending on your recipe, baking times typically range from 10-20 minutes for mini tarts.
After removing from the oven, immediately reshape the crust while still hot, as the mixture often puffs up during baking. Use the back of a spoon to gently press down the centers and reinforce the sides before cooling completely in the pan.
No-bake granola crust option
For those hot summer days, a no-bake version works perfectly. Simply crush your favorite granola until fine but still textured. Mix with enough honey or maple syrup to create a sticky mixture that holds together when pressed. Then refrigerate for 30 minutes or freeze for 15 minutes to set the crust before filling.
Common mistakes and how to fix them
The most frequent issues with granola crusts include:
- Over-processing ingredients—leave some texture for that signature granola crunch
- Not pressing firmly enough—resulting in crusts that fall apart
- Removing from pans too quickly—allow to cool completely before attempting to remove
- Filling too far in advance—add yogurt and toppings just before serving to prevent sogginess
Remember that granola crusts are naturally more delicate than traditional pastry crusts, so handle with care even when properly made.
Filling and Topping Ideas for Your Fruit Tart
With your perfectly shaped granola crust ready, it’s time to explore the delicious filling options that will transform your creation into a showstopping breakfast treat.
Yogurt options: Greek, coconut, almond
The foundation of most fruit tarts with granola crust is a creamy yogurt layer. Plain Greek yogurt stands out as the preferred option because of its thick consistency that holds shape without making your crust soggy. For those seeking extra flavor, vanilla Greek yogurt pairs beautifully with a variety of fruits. Essentially, you’ll need about 1 cup of yogurt to fill a standard tart shell.
For dairy-free alternatives, coconut yogurt offers a tropical undertone that complements exotic fruits. Alternatively, almond yogurt provides a nutty flavor that enhances the granola crust’s natural taste profile. Both options maintain enough thickness to prevent your no-bake granola crust from becoming saturated.
Adding lemon curd or jam for extra flavor
For a burst of brightness, consider adding lemon curd beneath or swirled into your yogurt layer. This tangy addition balances the sweetness of both the granola crust and fresh fruits. Indeed, some bakers even combine lemon curd with cream cheese for a richer, more decadent filling.
Another approach involves spreading a thin layer of jam before adding yogurt. Raspberry or apricot preserves not only add flavor depth but can actually help prevent your granola pie crust from becoming soggy by creating a protective barrier.
Best fruits for color and texture
When selecting fruits for your tart, aim for variety in color, shape, and texture:
- Berries (strawberries, blueberries, raspberries, blackberries) offer vibrant colors and retain their shape
- Kiwi, mango, and mandarin oranges add bright visual appeal
- Stone fruits like peaches and nectarines provide juicy sweetness
Avoid water-heavy fruits like watermelon or frozen fruits that release excess moisture. Comparatively, bananas and apples work well but should be brushed with lemon juice to prevent browning.
Seasonal fruit variations
Creating seasonal fruit tarts with granola crust allows you to enjoy this versatile recipe year-round. Spring welcomes strawberries and tangerines, whereas summer brings peaches, cherries, and a bounty of berries. Fall introduces figs and grapes, and winter offers citrus varieties that brighten darker days.
Themed combinations like tropical (pineapple, kiwi, mango) or citrus assortments (grapefruit, blood orange, clementine) create cohesive flavor profiles.
Tips for decorative presentation
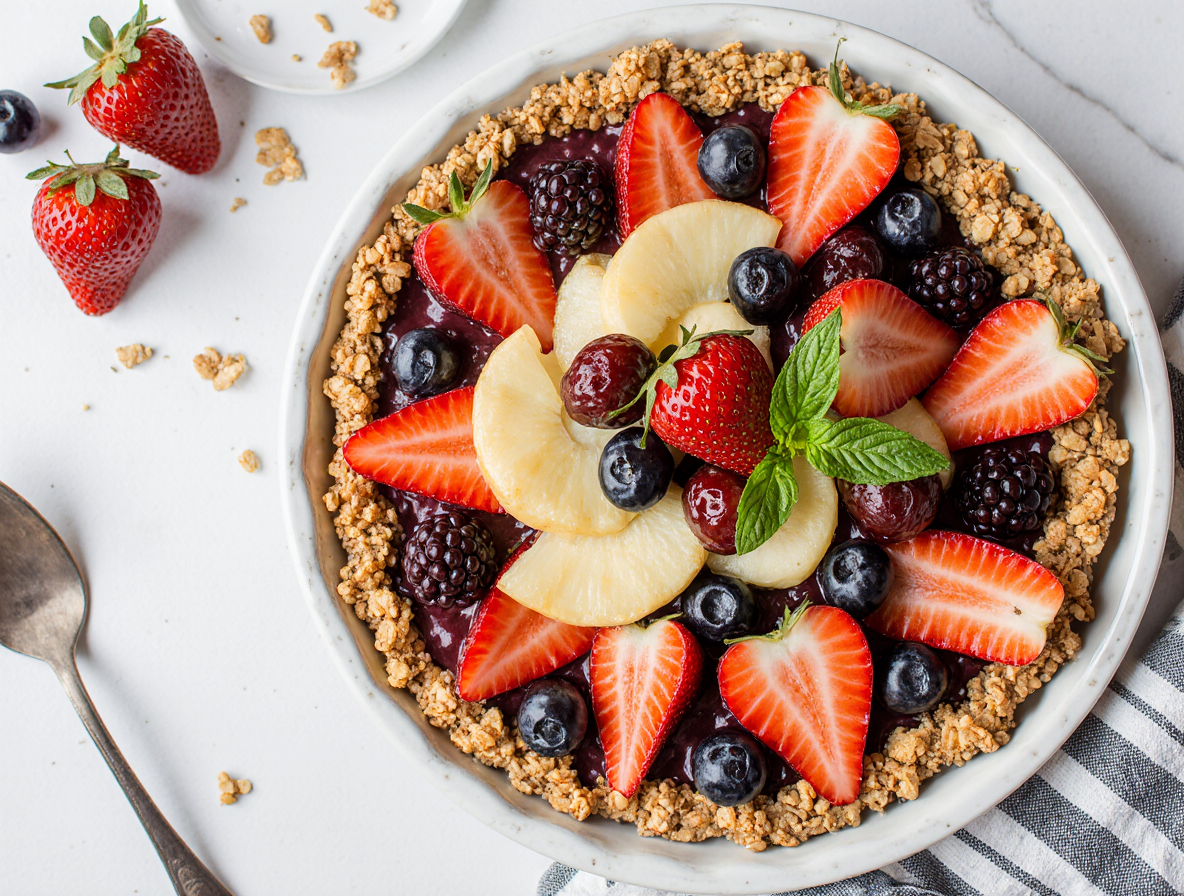
For truly impressive presentation, arrange fruits in concentric circles or create geometric patterns. Alternatively, try the “strawberry burst” technique – placing sliced strawberries stem-side down, working outward from the center.
Finally, applying a light glaze makes your fruit glisten and extends freshness. Simply heat 3 parts apricot or apple jam with 1 part water until clear, then brush over your arranged fruits for that professional bakery shine.
Storage, Serving, and Make-Ahead Tips
Preserving the beauty and flavor of your fruit tart requires proper storage and serving techniques. Since time and preparation are key factors, I’ve compiled these essential tips to help maintain your granola crust’s integrity from kitchen to table.
How to store granola crusts without breaking
The secret to storing granola crusts begins with cooling completely—at least 2 hours but ideally 5-6 hours or overnight. This patience ensures the crust dries thoroughly, maintaining its crispness. Properly cooled crusts can be stored in airtight containers at room temperature for up to 5 days, although unbaked granola mixtures generally last 2-4 weeks if kept dry.
For longer preservation, freezing works exceptionally well. Granola crusts maintain quality in the freezer for 3-4 months yet remain safe indefinitely. Before freezing, wrap cooled crusts in plastic wrap, then aluminum foil to prevent freezer burn. When ready to use, simply thaw at room temperature for 10-15 minutes.
Avoiding soggy crusts
Nothing ruins a beautiful tart faster than a soggy bottom! Fortunately, several techniques prevent this common issue. First, brush the inside of your baked, cooled crust with melted chocolate—this creates a moisture barrier between crust and filling while adding delightful flavor. Alternatively, brush with beaten egg white and bake for 2 additional minutes to create a protective seal.
Timing matters tremendously as well. Although components can be prepared in advance, assemble your tart shortly before serving—particularly when using fresh fruit that releases moisture. Additionally, if using a yogurt filling, add it no sooner than 2-3 hours before serving to prevent moisture migration into your granola crust.
Transporting tarts safely
Carrying your masterpiece to brunch requires strategic planning. Place tarts on a flat surface—car floorboards often work better than seats. Furthermore, use a yoga mat or non-slip shelf liner beneath your container to prevent sliding.
For carrying options, reusable carriers work perfectly for events where you’ll bring the container home. Conversely, disposable options with secure lids are ideal for leaving at gatherings. Whenever possible, transport the components separately and assemble on-site for maximum freshness.
Making ahead for brunch or events
Planning ahead simplifies entertaining without compromising quality. The granola crust can be prepared up to 5 days ahead and stored in an airtight container at room temperature. Similarly, fillings like pastry cream can be made 3 days ahead and refrigerated.
Subsequently, label containers with preparation dates to track freshness. Especially important—add fruit toppings just before serving as they release juices that may compromise your beautiful granola crust. Through careful planning, your breakfast fruit tart will delight guests with both beauty and flavor.
Conclusion
Breakfast fruit tarts with granola crust truly represent the perfect balance between impressive presentation and practical preparation. These versatile tarts allow endless creativity while remaining remarkably forgiving for both novice and experienced bakers alike.
My journey developing this recipe taught me that patience during cooling and assembly makes all the difference between a soggy disappointment and a crunchy, picture-perfect creation. Whether you choose the baked or no-bake method, your efforts will result in a beautiful centerpiece worthy of any brunch table.
The beauty of these tarts lies not only in their appearance but also their adaptability. You can certainly customize each component to suit your dietary preferences or seasonal availability. The granola crust welcomes various nut combinations, while the filling options range from thick Greek yogurt to dairy-free alternatives. Additionally, the fruit arrangements change with the seasons, giving you year-round versatility.
Perhaps most importantly, these breakfast tarts bridge the gap between healthy and indulgent. Unlike traditional dessert tarts laden with butter and refined sugar, our granola crust provides whole grains, healthy fats, and natural sweetness. Therefore, you can feel good about serving these beautiful creations to loved ones at your next gathering.
The next time you need an impressive breakfast that won’t keep you trapped in the kitchen, remember this fruit tart with granola crust. With just 20 minutes of active preparation and these simple techniques, you’ll create a memorable dish that looks like it came from a professional bakery. Your guests will undoubtedly ask for the recipe—though sharing it remains entirely optional!
FAQs
Q1. How long does it take to make a breakfast fruit tart with granola crust? The active preparation time for this breakfast fruit tart is about 20 minutes. However, cooling time for the crust and assembly should be factored in for the best results.
Q2. What type of oats should I use for the granola crust? Old-fashioned rolled oats are the best choice for the granola crust. They provide the necessary structure and maintain their shape during baking, unlike quick-cooking or instant oats.
Q3. Can I make the granola crust ahead of time? Yes, you can prepare the granola crust up to 5 days in advance. Store it in an airtight container at room temperature, or freeze it for longer storage (up to 3-4 months).
Q4. What’s the best way to prevent a soggy crust in a fruit tart? To prevent a soggy crust, you can brush the inside of the baked and cooled crust with melted chocolate or beaten egg white. Also, add the yogurt filling no more than 2-3 hours before serving, and add fresh fruit just before serving.
Q5. Can I make this fruit tart dairy-free? Absolutely! You can use dairy-free alternatives like coconut or almond yogurt for the filling. These options maintain enough thickness to prevent the crust from becoming saturated and offer unique flavor profil